Quantcast
Channel: Lucidworks
Viewing all 731 articles
Browse latest View live

Open Source Hadoop Connectors for Solr

$
0
0

Lucidworks is happy to announce that several of our connectors for indexing content from Hadoop to Solr are now open source.

We have six of them, with support for Spark, Hive, Pig, HBase, Storm and HDFS, all available in Github. All of them work with Solr 5.x, and include options for Kerberos-secured environments if required.

HDFS for Solr

This is a job jar for Hadoop which uses MapReduce to prepare content for indexing and push documents to Solr. It supports Solr running in standalone mode or SolrCloud mode.

It can connect to standard Hadoop HDFS or MapR’s MapR-FS.

A key feature of this connector is the ingest mapper, which converts content from various original formats to Solr-ready documents. CSV files, ZIP archives, SequenceFiles, and WARC are supported. Grok and regular expressions can be also be used to parse content. If there are others you’d like to see, let us know!

Repo address: https://github.com/LucidWorks/hadoop-solr.

Hive for Solr

This is a Hive SerDe which can index content from a Hive table to Solr or read content from Solr to populate a Hive table. 

Repo address: https://github.com/LucidWorks/hive-solr.

Pig for Solr

These are Pig Functions which can output the result of a Pig script to Solr (standalone or SolrCloud). 

Repo address: https://github.com/LucidWorks/pig-solr.

HBase Indexer

The hbase-indexer is a service which uses the HBase replication feature to intercept content streaming to HBase and replicate it to a Solr index.

Our work is a fork of an NGDATA project, but updated for Solr 5.x and HBase 1.1. It also supports HBase 0.98 with Solr 5.x. (Note, HBase versions earlier than 0.98 have not been tested to work with our changes.)

We’re going to contribute this back, but while we get that patch together, you can use our code with Solr 5.x.

Repo address: https://github.com/LucidWorks/hbase-indexer.

Storm for Solr

My colleague Tim Potter developed this integration, and discussed it back in May 2015 in the blog post Integrating Storm and Solr. This is an SDK to develop Storm topologies that index content to Solr.

As an SDK, it includes a test framework and tools to help you prepare your topology for use in a production cluster. The README has a nice example using Twitter which can be adapted for your own use case.

Repo address: https://github.com/LucidWorks/storm-solr.

Spark for Solr

Another Tim Potter project that we released in August 2015, discussed in the blog post Solr as an Apache Spark SQL DataSource. Again, this is an SDK for developing Spark applications, including a test framework and a detailed example that uses Twitter.

Repo address: https://github.com/LucidWorks/spark-solr.


Image from book cover for Jean de Brunhoff’s “Babar and Father Christmas“.

The post Open Source Hadoop Connectors for Solr appeared first on Lucidworks.com.


Erik Hatcher, Developer on Fire, Profiled by Dave Rael

Lucidworks Fusion 2.2 Now Available

$
0
0

Lucidworks Fusion 2.2 is now available for download!

Lucidworks is pleased to announce the release of Fusion 2.2, our platform for building and scaling search-driven apps. This is a preview release of new features and enhancements we have been working on.

Improved UI elements

We are continuously working on improving our interface and UX. The salient improvements in this release include:

lucidworks-fusion-2.2

  • Simplified home interface and panel management to get to where you need to be faster than ever.
  • Refined visual design to allow for increased information display.
  • Minimap navibar for smoother scrolling and/or quick jumps between open panels.
  • Full screen script editors for easier configuration.
  • Synonyms Manager with a new interface allowing for categorization and audit management of synonyms.

lucidworks-fusion-2.2-preview

New Connectors

We have 3 new data source connectors.

Alfresco

alfresco_logo

The Alfresco connector adheres to the Content Management Interoperability Services (CMIS) standard and has been tested with the Alfresco Community 5.0.d edition

ServiceNow

ServiceNow_logo

The ServiceNow connector allows for the crawl/recrawl of SN records of type Problem, Incident and kb_knowledge.

ZenDesk

zendesk-apache-solr-connector

The ZenDesk connector retrieves tickets, metrics, comments and attachments from the popular customer support system. It retrieves all tickets with all fields (e.g., customer, assignee, priority, status) as well as access restrictions for users and groups. We have also made numerous under the hood enhancements addressing connector indexing performance, speed and stability.

More details can be found in release notes.

So go ahead, and give our latest version a try!

The post Lucidworks Fusion 2.2 Now Available appeared first on Lucidworks.com.

Top Blog Posts of 2015

$
0
0

2015 was a banner year for our blog with fresh posts popping up constantly across a broad selection of topics from the brainiacs here at Lucidworks. Here’s our top ten most popular blog posts from the past year:

#10. Focusing on Search Quality at Lucene/Solr Revolution 2015

Ted Sullivan’s recap of Revolution 2015 starts off our countdown:

I just got back from Lucene/Solr Revolution 2015 in Austin on a big high. There were a lot of exciting talks at the conference this year, but one thing that was particularly exciting to me was the focus that I saw on search quality (accuracy and relevance), on the problem of inferring user intent from the queries, and of tracking user behavior and using that to improve relevancy and so on. … What was really cool to me was the different ways people are using to solve the same basic problem – what does the user want to find?

Read the full post. Stay tuned to all Lucene/Solr Revolution 2016 news via Twitter, Facebook or on http://lucenerevolution.org/.

#9. Apache Solr 5.0 Highlights

Anshum Gupta’s post outlining the best bits of the new Solr came in ninth:

The much anticipated Apache Lucene and Solr 5.0 was just released. It comes packed with tons of new features, stability improvements and bug fixes. A lot of effort has gone into making Solr more usable, mostly along the lines of introducing APIs and hiding implementation details for users who don’t need to know. Solr 4.10 was released with scripts to start, stop and restart Solr instance, 5.0 takes it further in terms of what can be done with those. The scripts now, for instance, copy a configset on collection creation so that the original isn’t changed. There’s also a script to index documents as well as the ability to delete collections in Solr. As an example, this is all you need to do to start SolrCloud, index lucidworks.com, browse through what’s been indexed, and clean up the collection.

Read the full post.

#8. Solr on Docker

Maritjn Koster’s walkthrough of running Solr in a Docker container:

It is now even easier to get started with Solr: you can run Solr on Docker with a single command: $ docker run –name my_solr -d -p 8983:8983 -t solr

Read the full post.

#7. Open Source Hadoop Connectors for Solr

Cassandra Targett’s post announcing our open source release of Hadoop connectors: 

Lucidworks is happy to announce that several of our connectors for indexing content from Hadoop to Solr are now open source. We have six of them, with support for Spark, Hive, Pig, HBase, Storm and HDFS, all available in Github. All of them work with Solr 5.x, and include options for Kerberos-secured environments if required. Repo: https://github.com/LucidWorks/

Read the full post.

#6. Solr as an Apache Spark SQL DataSource

Tim Potter’s primer on using Solr as an Apache Spark SQL DataSource:

The DataSource API provides a clean abstraction layer for Spark developers to read and write structured data from/to an external data source. In this first post, I cover how to read data from Solr into Spark. In the next post, I’ll cover how to write structured data from Spark into Solr.

Read the full post.

#5.Hey, You Got Your Facets in My Stats! You Got Your Stats In My Facets!!

Hoss’s walkthrough on facets and stats in Solr:

Solr has supported basic “Field Facets” for a very long time. Solr has also supported “Field Stats” over numeric fields for (almost) as long. But starting with Solr 5.0 (building off of the great work done to support Distributed Pivot Faceting in Solr) it will now be possible to compute Field Stats for each Constraint of a Pivot Facet. Today I’d like to explain what the heck that means, and how it might be useful to you.

Read the full post.

#4. Solr 5’s new ‘bin/post’ utility

Erik Hatcher’s guided tour of Solr 5’s new ‘bin/post’ utility:

This is the first in a three part series demonstrating how it’s possible to build a real application using just a few simple commands.  The three parts to this are getting data into Solr using bin/post, visualizing search results: /browse and beyond, putting it together realistically: example/files – a concrete useful domain-specific example of bin/post and /browse.

Read the full post.

#3. Solr Suggester

Erick Erickson’s explainer post on using Solr’s Suggester:

How would you like to have your user type “energy”, and see suggestions like: Energa Gedania Gdansk, Energies of God, United States Secretary of EnergyKinetic energy. The Solr/Lucene suggester component can make this happen quickly enough to satisfy very demanding situations. … There’s been a new suggester in town for a while, thanks to some incredible work by some of the Lucene committers. Along about Solr 4.7 or so support made it’s way into Solr so you could configure these in solrconfig.xml. 

Read the full post.

#2. Indexing Performance in Solr 5.2

Tim Potter runs Apache Solr 5.2 through the Solr Scale Toolkit – comparing it to Solr 4.8.1 with astounding results – and it’s our runner-up post:

Using Solr 4.8.1 running in EC2, I was able to index 130M documents into a collection with 10 shards and replication factor of 2 in 3,727 seconds (~62 minutes) using ten r3.2xlarge instances; please refer to my previous blog post for specifics about the dataset. This equates to an average throughput of 34,881 docs/sec. Today, using the same dataset and configuration, with Solr 5.2.0, the job finished in 1,704 seconds (~28 minutes), which is an average 76,291 docs/sec. To rule out any anomalies, I reproduced these results several times while testing release candidates for 5.2. To be clear, the only notable difference between the two tests is a year of improvements to Lucene and Solr!

Read the full post.

#1. Securing Solr with Basic Authentication

And at number one, the most popular post of 2015 was Noble Paul’s tutorial on securing Solr with 5.2’s new security API:

Until version 5.2, Solr did not include any specific security features. If you wanted to secure your Solr installation, you needed to use external tools and solutions which were proprietary and maybe not so well known by your organization. A security API was introduced in Solr 5.2 and Solr 5.3 will have full-featured authentication and authorization plugins that use Basic authentication and “permission rules” which are completely driven from ZooKeeper.

Read the full post.

Here’s to a new year of fantastic bloggy goodness! Never miss a post my subscribing to our blog via Facebook, Twitter, LinkedIn or subscribe via an old fashioned feed. 

The post Top Blog Posts of 2015 appeared first on Lucidworks.com.

Jake Mannix Joins Lucidworks as Principal Data Engineer

$
0
0

jake_profile

We are pleased to welcome Jake Mannix to the Lucidworks team as our new Principal Data Engineer.

Jake’s past work includes:

  • Working on data pipelining with Apache Spark to scale a semantic search engine at the Allen Institute for Artificial Intelligence.
  • Jake was tech lead for Twitter’s Data Science / Data Engineering team, building both the products and teams responsible for profile/account search, and text classification and interest modeling for personalized content recommendations.
  • At LinkedIn (before the days of SolrCloud), Jake worked on Apache Lucene-backed search engine development, then a generic entity-to-entity recommender system framework which ran ads, job recommendations, and profile recommendations.
  • Jake’s also been an Apache Mahout committer since the early days, focused originally on dimensionality reduction and linear algebra primitives as well as latent dirichlet allocation for topic modeling.
  • His original graduate work at Stanford and University of Washington was in theoretical physics (particle cosmology and strongly coupled field theories) and math (algebraic topology and differential geometry).

What will you be working on at Lucidworks?

“I’m getting back to my open source roots, and helping Lucidworks find the most appropriate places to apply natural language processing and machine learning to search, discovery, and recommender systems for the widest possible audience of users.”

What attracted you to Lucidworks?

“See above point on what I’ll be working on. Who ​wouldn’t want to do that?!?”

Welcome to the team, Jake!

The post Jake Mannix Joins Lucidworks as Principal Data Engineer appeared first on Lucidworks.com.

example/files – a Concrete Useful Domain-Specific Example of bin/post and /browse

$
0
0

The Series

This is the third in a three part series demonstrating how it’s possible to build a real application using just a few simple commands.  The three parts to this are:

In the previous /browse article, we walked you through to the point of visualizing your search results from an aesthetically friendlier perspective using the VelocityResponseWriter. Let’s take it one step further.

example/files – your own personal Solr-powered file-search engine

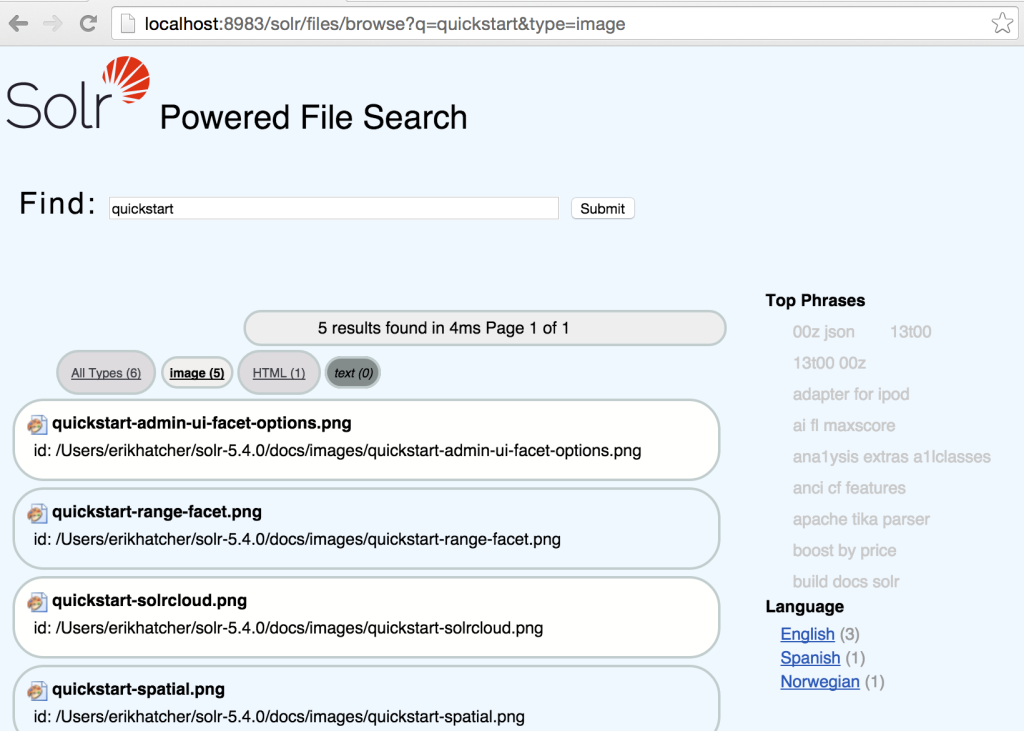
The new example/files offers a Solr-powered search engine tuned specially for rich document files. Within seconds you can download and start Solr, create a collection, post your documents to it, and enjoy the ease of querying your collection. The /browse experience of the example/files configuration has been tailored for indexing and navigating a bunch of “just files”, like Word documents, PDF files, HTML, and many other formats.

Above and beyond the default data driven and generic /browse interface, example/files features the following:

  • Distilled, simple, document type navigation
  • Multi-lingual, localizable interface 
  • Language detection and faceting
  • Phrase/shingle indexing and “tag cloud” faceting
  • E-mail address and URL index-time extraction
  • “instant search” (as you type results)

Getting started with example/files

Start up Solr and create a collection called “files”:

bin/solr start
bin/solr create -c files -d example/files

Using the -d flag when creating a Solr collection specifies the configuration from which the collection will be built, including indexing configuration and scripting and UI templates.

Then index a directory full of files:

bin/post -c files ~/Documents 

Depending on how large your “Documents” folder is, this could take some time. Sit back and wait for a message similar to the following:

23731 files indexed.
COMMITting Solr index changes to http://localhost:8983/solr/files/update…
Time spent: 0:11:32.323

And then open /browse on the files collection:

open http://localhost:8983/solr/files/browse

The UI is the App

With example/files we wanted to make the interface specific to the domain of file search.  With that in mind, we implemented a file-domain specific ability to facet and filter by high level “types”, such as Presentation, Spreadsheet, and PDF.   Taking a UI/UX-first approach, we also wanted “instant search” and a localizable interface./browse

The rest of this article explains, from the outside-in, the design and implementation from UI and URL aesthetics down to the powerful Solr features that make it possible.

URLs are UI too!

“…if you think about how you design them” – Cool URIs

Besides the HTML/JavaScript/CSS “app” of example/files, care was taken on the aesthetics and cleanliness of the other user interface, the URL.  The URLs start with /browse, describing the user’s primary activity in this interface – browsing a collection of documents.

Browsing by document type

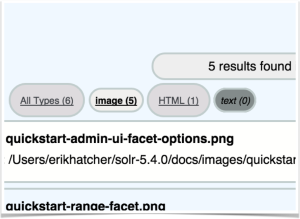
Results can be filtered by document “type” using the links at the top.


As you click on each type, you can see the “type” parameter changing in the URL request.

For the aesthetics of the URL, we decided filtering by document type should look like this: /browse?type=pdf (or type=html, type=spreadsheet, etc).  The interface also supports two special types: “all” to select all types and “unknown” to select documents with no document type.

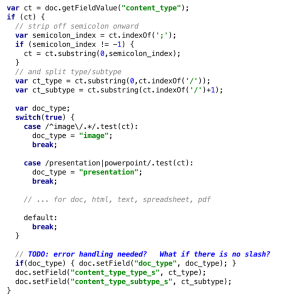
At index-time, the type of a document is identified.  An update processor chain (files-update-processor) isdoc type identification defined to run a script for each document.  A series of regular expressions determine the high-level type of the document, based off of the inherent “content_type” (MIME type) field set for each rich document indexed.  The current types are doc, html, image, spreadsheet, pdf, and text.  If a high-level type is recognized,  a doc_type field is set to that value.

No doc_type field is added if the content_type does not have an appropriate higher level mapping, an important aspect to the filtering technique specifics.  The /browse handler definition was enhanced with the following parameters to enable doc_type faceting and filtering using our own “type=…” URL parameter to filter by any of the types, including “all” or “unknown”:

  • facet.field={!ex=type}doc_type
  • facet.query={!ex=type key=all_types}*:*
  • fq={!switch v=$type tag=type case=’*:*’ case.all=’*:*’ case.unknown=’-doc_type:[* TO *]’ default=$type_fq}

There are some details of how these parameters are set worth mentioning here.  Two parameters, facet.field and facet.query, are specified in params.json utilizing the “paramset” feature of Solr.  And the fq parameter is appended in the /browse definition in solrconfig.xml (because paramsets don’t currently allow appending, only setting, parameters). 

The faceting parameters exclude the “type” filter (defined on the appended fq), such that the counts of the types shown aren’t affected by type filtering (narrowing to “image” types still shows “pdf” type counts rather than 0).  There’s a special “all_types” facet query specified, that provides the count for all documents, within the query and other filtering constrained set.  And then there’s the tricky fq parameter, leveraging the “switch” query parser that controls how the type filtering works from the custom “type” parameter.  When no type parameter is provided, or type=all, the type filter is set to “all docs” (via *:*), effectively not filtering by type.  When type=unknown, the special -doc_type:[* TO *] (note the dash/minus sign to negate), matching all documents that do not have a doc_type field.  And finally, when a “type” parameter other than all or unknown is provided, the filter used is defined by the “type_fq” parameter which is defined in params.json as type_fq={!field f=doc_type v=$type}.  That type_fq parameter specifies a field value query (effectively the same as fq=doc_type:pdf, when type=pdf) using the field query parser (which will end up being a basic Lucene TermQuery in this case). 

That’s a lot of Solr mojo just to be able to say type=image from the URL, but it’s all about the URL/user experience so it was worth the effort to implement and hide the complexity.

Localizing the interface

locale selectorThe example/files interface has been localized in multiple languages. Notice the blue global icon in the top right-hand corner of the /browse UI.  Hover over the globe icon and select a language in which to view your collection.

Each text string displayed is defined in standard Java resource bundles (see the files under example/files/browse-resources).  For example, the text (“Find” in English) that appears just before the search input box is specified in each of the language-specific resource files as:

English: find=Find
French: find=Recherche
German: find=Durchsuchen

The VelocityResponseWriter’s $resource tool picks up on a locale setting.  In the browse.vm (example/files/conf/velocity/browse.vm) template, the “find” string is specified generically like this:

$resource.find: <input name=”q”…/>

From the outside, we wanted the parameter used to select the locale to be clean and hide any implementation details, like /browse?locale=de_DE.  

The underlying parameter needed to control the VelocityResponseWriter $resource tool’s locale is v.locale, so we use another Solr technique (parameter substitution) to map from the outside locale parameter to the internal v.locale parameter.

This parameter substitution is different than “local param substitution” (used with the “type” parameter settings above) which only applies as exact param substitution within the {!… syntax} as dollar signed non-curly bracketed {!… v=$foo} where the parameter foo (&foo=…) is substituted in. The dollar sign curly bracketed syntax can be used as an in-place text substitution, allowing a default value too like ${param:default}.

To get the URLs to support a locale=de_DE parameter, it is simply substituted as-is into the actual v.locale parameter used to set the locale within the Velocity template context for UI localization. In params.json we’ve specified v.locale=${locale}

Language detection and faceting

It can be handy to filter a set of documents by its language.  Handily, Solr sports two(!) different language detection implementations so we wired one of them up into our update processor chain like this:

<processor class="org.apache.solr.update.processor.LangDetectLanguageIdentifierUpdateProcessorFactory">
  <lst name="defaults">
    <str name="langid.fl">content</str>
    <str name="langid.langField">language</str>
  </lst>
</processor>

With the language field indexed in this manner, the UI simply renders its facets (facet.field=language, in params.json), allowing filtering too.

Phrase/shingle indexing and “tag cloud” faceting

Seeing common phrases can be used to get the gist of a set of documents at a glance.  You’ll notice the top phrases change as a result of the “q” parameter changing (or filtering by document type or language).  The top phrases reflect phrases that appear most frequently in the subset of results returned for a particular query and applied filters. Click on a phrase to display the documents in your results set that contain the phrase. The size of the phrase corresponds to the number of documents containing that phrase.

Phrase extraction of the “content” field text occurs by copying to a text_shingles field which creates phrases using a ShingleFilter.  This feature is still a work in progress and needs improvement in extracting higher quality phrases; the current rough implementation isn’t worth adding a code snippet here to imply folks should copy/paste emulate it, but here’s a pointer to the current configuration – https://github.com/apache/lucene-solr/blob/branch_5x/solr/example/files/conf/managed-schema#L408-L427 

E-mail address and URL index-time extraction

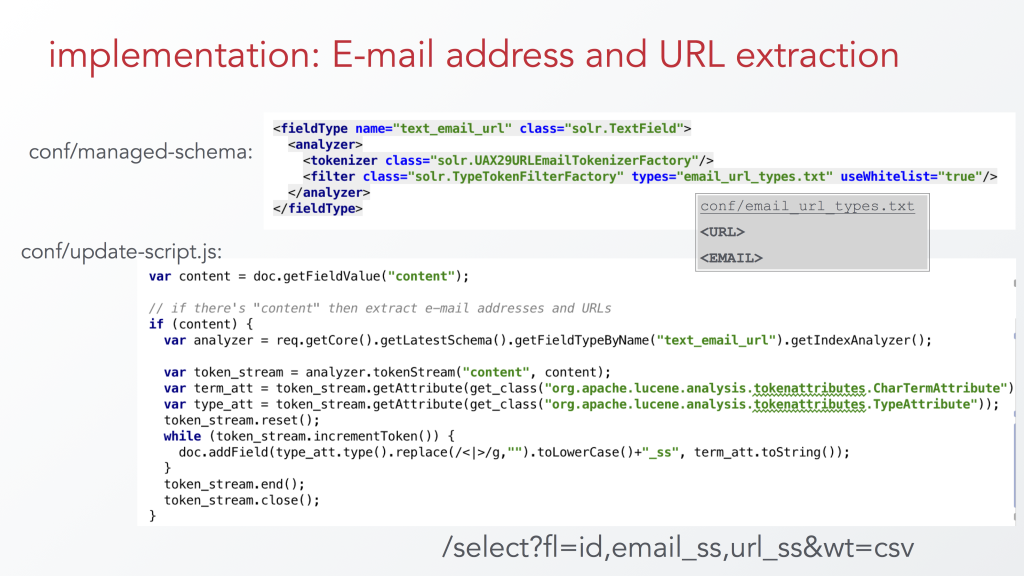
One, currently unexposed, feature added for fun is the index-time extraction of e-mail addresses and URLs from document content.  With phrase extraction as described above, the use is to allow for faceting and filtering, but when looking at an individual document we didn’t need the phrases stored and available. In other words, text_shingles did not need to be a stored field, and thus we could leverage the copyField/fieldType technique.  But for extracted e-mail addresses and URLs, it’s useful to have these as stored (multi-valued), not just indexed terms… which means our indexing pipeline needs to provide these independently stored values.  The copyField/fieldType-extraction technique won’t suffice here.  However, we can use a field type definition to help, and take advantage of its facilities within an update script.  Update processors, like the script one used here, allow for full manipulation of an incoming document, including adding additional fields, and thus their value can be “stored”.  Here are the configuration pieces that extract e-mail addresses and URLs from text:

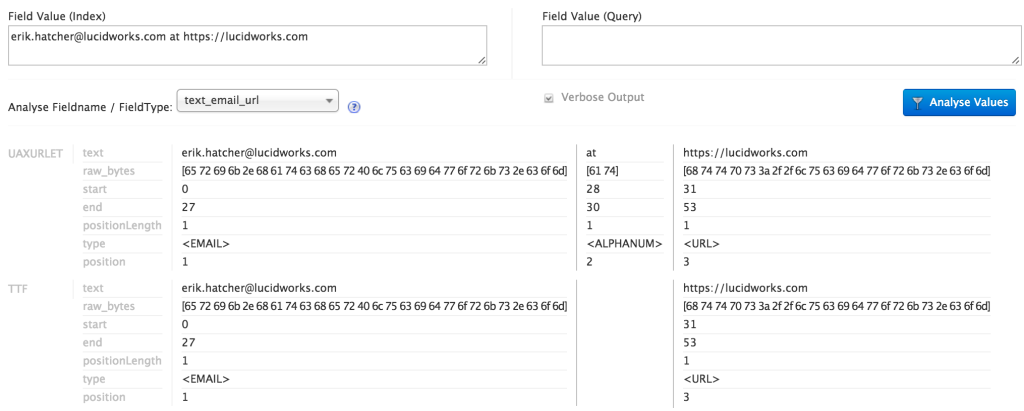
email address and url extraction The Solr admin UI analysis tool is useful for seeing how this field type works. The first step, through the UAX29URLEmailTokenizer, tokenizes the text in accordance with the Unicode UAX29 segmentation specification with the special addition to recognize and keep together e-mail addresses and URLs. During analysis, the tokens produced also carry along a “type”. The following screenshot depicts the Solr admin analysis tool results of analyzing an “e-mail@lucidworks.com https://lucidworks.com” string with the text_email_url field type. The tokenizer tags e-mail addresses with a type of, literally, “<EMAIL>” (angle brackets included), and URLs as “<URL>”. There are other types of tokens that URL/email tokenizer emits, but for this purpose we only want to screen out everything but e-mail addresses and URLs. Enter TypeTokenFilter, allowing only a strictly specified set of token type values to pass through. In the screenshot you’ll notice the text “at” was identified as type “<ALPHANUM>”, and did not pass through the type filter. An external text file (email_url_types.txt) contains the types to pass through, and simply contains two lines with the values “<URL>” and “<EMAIL>”.

text_email_url analysis example

So now we have a field type that can do the recognition and extraction of e-mail address and URLs. Let’s now use it from within the update chain, conveniently possible in update-script.js. With some scary looking JavaScript/Java/Lucene API voodoo, it’s achieved with the code shown above in update-script.js.  That code is essentially how indexed fields get their terms, we’re just having to do it ourselves to make the values *stored*.

This technique was originally described in the “Analysis in ScriptUpdateProcessor” section of this this presentation: http://www.slideshare.net/erikhatcher/solr-indexing-and-analysis-tricks

example/files demonstration video

Thanks go to Esther Quansah who developed much of the example/files configuration and produced the demonstration video during her internship at Lucidworks.

What’s next for example/files?

An umbrella Solr JIRA issue has been created to note these desirable fixes and improvements – https://issues.apache.org/jira/browse/SOLR-8590 – including the following items:

  • Fix e-mail and URL field names (<email>_ss and <url>_ss, with angle brackets in field names), also add display of these fields in /browse results rendering
  • Harden update-script: it currently errors if documents do not have a “content” field
  • Improve quality of extracted phrases
  • Extract, facet, and display acronyms
  • Add sorting controls, possibly all or some of these: last modified date, created date, relevancy, and title
  • Add grouping by doc_type perhaps
  • fix debug mode – currently does not update the parsed query debug output (this is probably a bug in data driven /browse as well)
  • Filter out bogus extracted e-mail addresses

The first two items were fixed and patch submitted during the writing of this post.

Conclusion

Using example/files is a great way of exploring the built-in capabilities of Solr specific to rich text files. 

A lot of Solr configuration and parameter trickery makes /browse?locale=de_DE&type=html a much cleaner way to do this: /select?v.locale=de_DE&fq={!field%20f=doc_type%20v=html}&wt=velocity&v.template=browse&v.layout=layout&q=*:*&facet.query={!ex=type%20key=all_types}*:*&facet=on… (and more default params) 

Mission to “build a real application using just a few simple commands” accomplished!   It’s so succinct and clean that you can even tweet it!

https://lucidworks.com/blog/2016/01/27/example_files:$ bin/solr start; bin/solr create -c files -d example/files; bin/post -c files ~/Documents #solr


The post example/files – a Concrete Useful Domain-Specific Example of bin/post and /browse appeared first on Lucidworks.com.

Happy 10th Birthday Apache Solr!

$
0
0

January marked the tenth anniversary of Yonik Seeley’s fateful post on the Apache incubator listserv back in January of 2006:

Hello Incubator PMC folks, I would like to propose a new Apache project named Solr.

http://wiki.apache.org/incubator/SolrProposal

The project is being proposed as a sub-project of Lucene, and the Lucene PMC has agreed to be the sponsor.

-Yonik

Seeley also included the full proposal which includes cultivating an active open source community as a top priority with Doug Cutting as the sponsor and the first three initial committers: Seeley himself, Bill Au, and Chris “Hoss” Hostetter. And here we are, 10 years later and Apache Solr is the most deployed open source search technology on the planet with thousands of production instances. 

We’ve updated our ‘history of Solr’ infographic with the results of our developer survey from the fall. More survey results on the way.

Apache_Solr_History_Infographic

Learn more about Lucidworks Fusion, our Solr-powered application development platform for building intelligent search-driven apps.

The post Happy 10th Birthday Apache Solr! appeared first on Lucidworks.com.

Fusion plus Solr Suggesters for More Search, Less Typing

$
0
0

The Solr suggester search component was previously discussed on this blog in the post Solr Suggester by Solr committer Erick Erickson. This post shows how to add a Solr suggester component to a Fusion query pipeline in order to provide the kind of auto-complete functionality expected from a modern search app.

By auto-complete we mean the familiar set of drop-downs under a search box which suggest likely words or phrases as you type. This is easy to do using Solr’s FST-based suggesters. FST stands for “Finite-State Transducer”. The underlying mechanics of an FST allow for near-matches on the input, which means that auto-suggest will work even when the inputs contain typos or misspellings. Solr’s suggesters return the entire field for a match, making it possible to suggest whole titles or phrases based on just the first few letters.

The data in this example is derived from data collected by the Movie Tweetings project between 2013 and 2016. A subset of that data has been processed into a CSV file consisting of a row per film, with columns for a unique id, the title, release year, number of tweets found, and average rating across tweets:

id,title,year,ct,rating
...
0076759,Star Wars: Episode IV - A New Hope,1977,252,8.61111111111111
0080684,Star Wars: Episode V - The Empire Strikes Back,1980,197,8.82233502538071
0086190,Star Wars: Episode VI - Return of the Jedi,1983,178,8.404494382022472
1185834,Star Wars: The Clone Wars,2008,11,6.090909090909091
2488496,Star Wars: The Force Awakens,2015,1281,8.555815768930524
...

After loading this data into Fusion, I have a collection named “movies”. The following screenshot shows the result of a search on the term “Star Wars”.

img

The search results panel shows the results for the search query “Star Wars”, sorted by relevancy (i.e. best-match). Although all of the movie titles contain the words “Star Wars”, they don’t all begin with it. If you’re trying to add auto-complete to a search box, the results should complete the initial query. In the above example, the second best-match isn’t a match at all in an auto-complete scenario. Instead of using the default Solr “select” handler to do the search, we can plug in an FST suggester, which will give us not just auto-complete, but fuzzy autocomplete, through the magic of FSTs.

Fusion collections are Solr collections which are managed by Fusion. To add a Lucene/Solr suggester to the “movies” collection requires editing the Solr config files according to the procedure outlined in the “Solr Suggester” blogpost:

  • define a field with the correct analyzer in file schema.xml
  • define a request handler for auto-complete in file solrConfig.xml

Fusion sends search requests to Solr via the Fusion query pipeline Solr query stage, therefore it’s also necessary to configure a Solr query stage to access the newly configured suggest request handler.

The Fusion UI provides tools for editing Solr configuration files. These are available from the “Configuration” section on the collection “Home” panel, seen on the left-hand side column in the above screenshot. Clicking on the “Solr Config” option shows the set of available configuration files for collection “movies”:

img

Clicking on file schema.xml opens an edit window. I need to define a field type and specify how the contents of this field will be analyzed when creating the FSTs used by the suggester component. To do this, I copy in the field definition from the very end of the “Solr Suggester” blogpost:

<!-- text field for suggestions, taken from:  https://lucidworks.com/blog/2015/03/04/solr-suggester/ -->
<fieldType name="suggestTypeLc" class="solr.TextField" positionIncrementGap="100">
  <analyzer>
    <charFilter class="solr.PatternReplaceCharFilterFactory" pattern="[^a-zA-Z0-9]" replacement=" " />
    <tokenizer class="solr.WhitespaceTokenizerFactory"/>
    <filter class="solr.LowerCaseFilterFactory"/>
  </analyzer>
</fieldType>

img

After clicking the “Save” button, the Fusion UI displays the notification message: “File contents saved and collection reloaded.”

Next I edit the solrConfig.xml file to add in definition for the suggester search component and corresponding request handler:

img

This configuration is based on Solr’s “techproducts” example, based on the Suggester configuration docs in the Solr Reference Guide. The suggest search component is configured with parameters for the name, and implementation type of the suggester, the field to be analyzed, the analyzer used. We also specify the optional parameter weightField which, if present, returns an additional document field that can be used for sorting.

For this example, the field parameter is movie_title_txt. The suggestAnalyzerFieldType specifies that the movie title text will be analyzed using the analyzer defined for field type suggestTypeLc, (added to the schema.xml file for the “movies” collection in the previous step). Each movie has two kinds of ratings information: average rating and count (total number of ratings from tweets). Here, the average rating value is specified:

<searchComponent name="suggest" class="solr.SuggestComponent">
    <lst name="suggester">
      <str name="name">mySuggester</str>
      <str name="lookupImpl">FuzzyLookupFactory</str>
      <str name="dictionaryImpl">DocumentDictionaryFactory</str>
      <str name="storeDir">suggester_fuzzy_dir</str>
      <str name="field">movie_title_txt</str>
      <str name="weightField">rating_tf</str>
      <str name="suggestAnalyzerFieldType">suggestTypeLc</str>
    </lst>
</searchComponent>

For details, see Solr wiki Suggester seachComponent section.

The request handler configuration specifies the request path and the search component:

<requestHandler name="/suggest" class="solr.SearchHandler">
    <lst name="defaults">
      <str name="suggest">true</str>
      <str name="suggest.count">10</str>
      <str name="suggest.dictionary">mySuggester</str>
    </lst>
    <arr name="components">
      <str>suggest</str>
    </arr>
</requestHandler>

For details, see Solr wiki Suggester requestHandler section.

After each file edit, the collection configs are saved and the collection is reloaded so that changes take effect immediately.

Finally, I configure a pipeline with a Solr query stage which permits access to the suggest request handler:

img

Lacking a UI with the proper JS magic to show autocomplete in action, we’ll just send a request to the endpoint, to see how the suggest request handler differs from the default select request handler. Since I’m already logged into the Fusion UI, from the browser location bar, I request the URL:

http://localhost:8764/api/apollo/query-pipelines/movies-default/collections/movies/suggest?q=Star%20Wars

img

The power of the FST suggester lies in its robustness. Misspelled and/or incomplete queries still produce good results. This search also returns the same results as the above search:

http://localhost:8764/api/apollo/query-pipelines/movies-default/collections/movies/suggest?q=Strr%20Wa

Under the hood, Lucidworks Fusion is Solr-powered, and under the Solr hood, Solr is Lucene-powered. That’s a lot of power. The autocompletion for “Solr-fu” is “Solr-Fusion”!

The post Fusion plus Solr Suggesters for More Search, Less Typing appeared first on Lucidworks.com.


Welcome Trey Grainger!

$
0
0

We’re happy to announce another new addition to the Lucidworks team! Trey Grainger has joined as Lucidworks SVP of Engineering where he’ll be heading up our engineering efforts for both open source Apache Lucene/Solr and our Lucidworks Fusion platform, and our other product offerings.

Trey most recently served as the Director of Engineering on the Search & Recommendations team at CareerBuilder, where he built out a team of several dozen software engineers and data scientists to deliver a robust semantic search, data analytics, and recommendation engine platform. This platform contained well over a billion documents and powered over 100 million searches per day across a large combination of consumer-facing websites and B2B Software as a Service products.

Trey is also the co-author of Solr in Action, the comprehensive example-driven guide to Apache Solr (his co-author was Tim Potter, another Lucidworks engineer).

Trey received his MBA in Management of Technology from Georgia Tech, studied Computer Science, Business, and Philosophy at Furman University, and has also completed Masters-level work in Information Retrieval and Web Search from Stanford University.

We sat down with Trey to learn more about his passion for search:

When did you first get started working with Apache Lucene?

In 2008, I was the lead engineer for CareerBuilder’s newly-formed search team and was tasked with looking for potential options to replace the company’s existing usage of Microsoft’s FAST search engine. Apache Lucene was a mature option at that point, and Apache Solr was rapidly maturing to the point where it could support nearly all of the necessary functionality that we needed. After some proof of concept work, we decided to migrate to Solr, which enabled us to leverage and extend the best Lucene had to offer, while providing a highly reliable out-of-the-box search server which supported distributed search (scale out with shards, scale up with replicas) and an extensively pluggable architecture and set of configuration options. We started migrating to Solr in 2009 and completed the migration in 2010, by which time the Lucene and Solr projects had actually merged their code bases into one project. Ever since then, I’ve had the tremendous opportunity to help develop, speak about, write about, and run teams pushing forward the tremendous capabilities available in the Lucene/Solr ecosystem.

How has search evolved over the past couple years? Where do you think it’ll be in the next 10?

Over the last decade, the keyword search box has really evolved to become the de facto user interface for exploring data and for navigating most websites and applications. Companies used to pay millions of dollars to license search technology that did little more than basic text search, highlighting, and faceting. As Lucene/Solr came on the scene and commoditized those capabilities, search engineers were able to fully embrace the big data era and focus on building out scalable infrastructure to run their open-source-based search systems. With the rise of cloud computing and virtual machines, Solr likewise developed to scale elastically with automatic sharding, replication, routing, and failover in such a way that most of the hard infrastructure work has now also become commoditized. Lucene/Solr have also become near-real-time systems, enabling an impressive suite of real-time analytics and matching capabilities.

With all of these changes, I’ve seen the value proposition for search shift significantly from “providing a keyword box”, to “scalable navigation through big data”, and another massive shift is now underway. Today, more companies than ever are viewing search not just as infrastructure to enable access to data, but instead as the killer application needed to provide insights and highly-relevant answers to help their customers and move their businesses forward.

I thus anticipate seeing an ever growing focus on domain-driven relevance over the coming years. We’re already seeing industry-leading companies develop sophisticated semantic search capabilities that drive tremendous customer value, and I see the next decade being one where such intelligent capabilities are brought to the masses.

What do you find most exciting in the current search technology landscape?

The current frontier of search relevancy (per my answer to the last question) is what most excites me right now in the search technology landscape. Now that core text search, scaling, and cluster management have become much more commoditized, we’re beginning to see increased focus on relevancy as a key competitive differentiator across many search applications. Doing relevancy well includes adding capabilities like query intent inference, entity extraction, disambiguation, semantic and conceptual search, automatic classification and extraction of knowledge from documents, machine-learned ranking, using clickstream feedback for boosting and collaborative filtering, per-user personalization and recommendations, and evolving search to be able to able to provide answers instead of just lists of documents as a response to natural language questions. Many of these capabilities require external systems to support sophisticated workflows and feedback loops (such as those already built into Lucidworks Fusion through the combination pipelines with Solr + Spark), and Lucidworks is at the forefront of pushing this next generation of intelligent search applications.

Where are the biggest challenges in the search space?

Some of the most fun challenges I’ve tackled in my career have been building systems for inferring query intent, recommendation systems, personalized search, and machine-learned relevancy models. There’s one key thing I learned about search along the way: nothing is easy at scale or in the tail. It took me years of building out scalable search infrastructure (with mostly manual relevancy tuning) before I had sufficient time to really tackle the long tail of relevancy problems using machine learning to solve them in an optimal way.

What’s particularly unique about the search space is that it requires deep expertise across numerous domains to do really well. For example, the skillsets needed to build and maintain scalable infrastructure include topics like distributed systems, data structures, performance and concurrency optimization, hardware utilization, and network communication. The skills needed to tackle relevancy include topics like domain expertise, feature engineering, machine learning, ontologies, user testing, and natural language processing. It’s rare to find people with all of these skillsets, but to really solve hard search problems well at scale and in the tail, all of these topics are important to consider.

What attracted you to Lucidworks?

Interesting problems and a shared vision for what’s possible. What attracted me to Lucidworks is opportunity to work with visionaries in the search space building search technology that will help the masses derive intelligence from their data both at scale and in the tail. Search is a really hard problem, and I’m excited to be in great company trying to solve that problem well.

What will you be working on at Lucidworks?

As SVP of Engineering, I’ll be heading up our engineering efforts around both open source Lucene/Solr, as well as Lucidworks Fusion and our other exciting product offerings. With Lucidworks employing a large percentage of Lucene/Solr committers, we take good stewardship of the open source project very seriously, and I’m excited to be able to work more on the strategic direction of our open source contributions. Additionally, I’ll be working to drive Fusion as the next generation platform for building search-driven, intelligent applications. I’m incredibly excited to be working with such a top-notch team at Lucidworks, and am looking forward to building out what will be the most scalable, dependable, easy to use, and highly relevant search product on the market.


Welcome, Trey!

The post Welcome Trey Grainger! appeared first on Lucidworks.com.

Solr’s DateRangeField, How Does It Perform?

$
0
0

Solr’s DateRangeField

I have to credit David Smiley as co-author here. First of all, he’s largely responsible for the spatial functionality and second he’s been very generous explaining some details here. Mistakes of course are my responsibility of course. Solr has had a new DateRangeField for quite some time (since 5.0, see SOLR-6103. DateRangeFields are based on more of the magic of Solr Spatial and allow some very interesting ways of working with dates. Here are a couple of references to get you started. Working with dates, Solr Reference Guide Spatial for Time Durations

About DateRangeField:

  • It is a fieldType
  • It supports friendlier date specifications, that is you can form queries like q=field:[2000-11-01 TO 2014-12-01] or q=field:2000-11
  • It supports indexing a date range in a single field. For instance a field in a document could be added to a document in SolrJ as solrInputDocument.addField(“dateRange”, “[2000 TO 2014-05-21]”) or in an XML format as <field name="dateRange">[2000 TO 2014-05-21]</field>
  • It supports multi-valued date ranges. This has always been a difficult thing to do with Solr/Lucene. To index a range, one had to have two fields, say “date_s” and “date_e”. It was straightforward to perform a query that found docs spaning some date, it looked something like q=date_e:[* TO target] AND date_s:[target TO *]. This worked fine if the document only had one range, but when two or more ranges were necessary, this approach falls down since if date_s and date_e have multiValued=”true”, the query above would find the doc if any entry in date_s was < than target date and any date_e was > the target date..

Minor rant: I really approve of Solr requiring full date specifications in UTC time, but I do admit it is sometimes a bit awkward, the ability to specify partial dates is pretty cool. DateRangeField more naturally expresses some of the concepts we often need to support with dates in documents. For instance, “this document is valid from dates A to B, C to D and M to N”. There are other very interesting things that can be done with this “spatial” stuff, see: Hossman’s Spatial for Non Spatial. Enough of the introduction. In the Reference Guide, there’s the comment “Consider using this [DateRangeField] even if it’s just for date instances, particularly when the queries typically fall on UTC year/month/day/hour etc. boundaries.” The follow-on question is “well, how does it perform?” I recently had to try to answer that question and realized I had no references so I set out to make some. The result is this blog.

Methodology:

For this test, there are a few things to be aware of.

  • This test does not use the fancy range capabilities. There are some problems that are much easier if you can index a range, but this is intended to compare the “just for date instances” from the quote above. Thus it is somewhat apples-to-oranges. What it is intended to help evaluate is the consequences of using DateRangeField as a direct substitute for TrieDate (with or without DocValues)
  • David has a series of improvements in mind that will change some of these measurements, particularly the JVM heap necessary. These will probably not require re-indexing.
  • The setup has 25M documents in the index. There are a series of 1,000 different queries sent to the server and the results tallied. Measurements aren’t taken until after 100 warmup queries are executed. Each group of 1,000 queries are one of the following patterns:
    • q=field:date. These are removed from the results since it isn’t interesting, the response times are all near 0 milliseconds after warmup.
    • simple q=field:[date1 TO date2]. These are not included in the graph as they’re not interesting, they all are satisfied too quickly to be of consequence.
    • interval facets, facet=true&...facet.range.start=date1&facet.range.end=date2&facet.range.gap=+1DAY (or MINUTE or..).
    • 1-5 facet.query clauses where q=*:*
    • The setup is not SolrCloud as it shouldn’t really impact the results.
  • The queries were run with 1, 10, 20, and 50 threads to see if there was some weirdness when the Solr instances got really busy. There weren’t, the results produced essentially the same graphs so the graph below is for the 10 thread version.
  • The DateRangeType was compared to:
    • TrieDate, indexed=”true” docValues=”false” (TrieDate for the rest of this document)
    • TrieDate, indexed=”true” docValues=”true” (DocValues in the rest of this document)
  • I had three cores, one for each type. Each core had identical documents with very simple docs, basically the ID field and the dateRange field (well, the _version_ field was defined too). For each test
    • Only the core under test was active, the other two were not loaded (trickery with core.properties if you must know)
    • At the end of each test I measured the memory consumption, but the scale is too small to draw firm conclusions. What I _can_ report is that DateRangeType is not wildly different at this point. That said, see the filterCache comments in David’s comments below.
    • Statistics were gathered on an external client where QTimes were recorded

Results

  • As the graph a bit later shows, DateRangeField out-performed both TrieDate and DocValues in general.
  • The number of threads made very little difference in the relative performance of DateRangeField .vs. the other two. Of course the absolute response time will increase as enough threads are executing at once that the CPU gets saturated.
  • DateRangeFields have a fairly constant improvement when measured against TrieDate fields and TrieDate+DocValues.
  • The facet.range.method=dv option was not enabled on these tests. For small numbers of hits, specifying this value may well significantly improve performance, but this particular test uses a minimum bucket size of 1M which empirically is beyond the number of matches where specifying that parameter is beneficial. I’ll try to put together a follow-on blog with smaller numbers of hits in the future.

The Graph

These will take a little explanation. Important notes.

  • The interval and query facets are over the entire 25M documents. These are the points on the extreme right of the graph. These really show that for interval and query facets, in terms of query time, the difference isn’t huge.
  • The rest of the marks (0-24 on the X axis) are performance over hits of that many million docs for day, minute and millisecond ranges. So a value of 10 on the x axis is the column for result sets of 10M documents for TrieDate and TrieDate+DocValues.
  • The few marks above 1 (100%) are instances where DateRangeFields were measured as a bit slower. This may be a test artifact.
  • The Y-axis is the percent of the time the DateRange fields took .vs. the TrieDate (green Xs) and TrieDate+DocValues (red Xs).

Pretty Graph

Index and memory size

The scale is too small to report on index and memory differences. At this size (25M date fields), the difference between index only and docValues in both memory and disk sizes (not counting DateRangeField) was small enough that it was buried in the noise so even though I looked at it, it’s misleading at best to report, say, a difference of 1%. See David’s comments below. We do know that DocValues will increase the on-disk index size and decrease JVM memory required by roughly the size of the *.dvd files on disk.

David Smiley’s enrichment

Again, thanks to David for his tutorials. Here are some things to keep in mind:

  • The expectation is that DateRangeField should be faster than TrieDateField for ranges that are aligned to units of a second or coarser than that; but perhaps not any coarser than a hundred years apart.
  • So if you expect to do range queries from some random millisecond to another, you should continue to use TrieDate; otherwise consider DateRangeField.
  • [EOE] I have to emphasize again that the DateRangeField has applications to types of queries that were not exercised by this test. There are simply problems that are much easier than using DateRangeField. This exercise was just to stack up DateRangeField against the other variants.
  • TrieDate+DocValues does not use the filterCache at all, whereas TrieDate-only and DateRangeField do. At present there isn’t a way to tell DateFangeField to not use filterCache. That said, one of the future enhancements is to enable facet.range with DateRangeField to use the low-level facet implementation in common with the spatial heatmap faceting, which would result in DateRangeField not using filterCache.
    • [EOE] If you want more details on this, ask David, he’s the wizard. I’ll add that the heatmap stuff is very cool, I saw someone put this in their application in 2 hours one day (not DateRangeField, just a heatmap). Admittedly the browser display bits were an off-the-shelf bit of code.
  • Another thing on the radar worth mentioning is the advent of “PointValues” (formerly known as DimensionalValues) in Lucene 6. It would stack up like a much faster TrieDateField (without DocValues)
  • Discussions pertaining to memory use or realtime search mostly just apply to facet.range.  For doing a plain ‘ol range query search, the DV doesn’t even apply and there’s no memory requirements/concern.

Closing remarks

As always, your mileage may vary when it comes to using DateRangeFields.

  • For realtime searches, docValues are preferred over both TrieDate-only and DateRangeFields, although in the future that may change.
  • As more work is done here more functionality will be pushed down into the OS’s memory so the JVM usage by DateRangeField will be reduced.
  • If your problem maps more fully into the enhanced capabilities of DateRangeField, it should be preferentially used. Performace will not suffer (at least as measured by these tests), but you will pay a memory cost over TrieDate+DocValues
  • I had the filterCache turned off for this exercise. This is likely a closer simulation of NRT setups, but in a relatively static index DateRangeField using the fiterCache needs to be evaluated in your specific situation to determine the consequences.

Over-analysis

Originally, I wanted to compare memory usage, disk space etc. There’s a tendency to try to pull information that just isn’t there out of a limited test. After I dutifully gathered many of those bits of information I realized that… there wasn’t enough information there to extract any generalizations from. Anything I could say based on this data other than what David provided and what I know to be true (e.g. docValues increase index size on disk but reduce JVM memory) would not be particularly relevant… As always, please post any comments you have, especially Mr. Smiley! Erick Erickson

The post Solr’s DateRangeField, How Does It Perform? appeared first on Lucidworks.com.

The Data That Lies Beneath: A Dark Data Deep Dive

Secure Fusion: SSL Configuration

$
0
0

This is the first in a series of articles on securing your data in Lucidworks Fusion.

The first step in securing your data is to make sure that all data sent to and from Fusion is encrypted by using HTTPS and SSL instead of regular HTTP. Because this encryption happens at the transport layer, not the application layer, when Fusion is configured for HTTPS and SSL, the only noticeable change is the lock icon in the browser location display which indicates that the HTTPS protocol is being used:

ssl icon

SSL encryption keeps your data private as it travels across the wire, preventing intermediate servers from eavesdropping on your conversation, or worse. SSL certificates are used to verify the identity of of a server in order to prevent “man-in-the-middle” attacks. Should you always configure Fusion to use SSL? If Fusion is on a secure network and doesn’t accept requests from external servers, no. Otherwise, Yes!

To configure Fusion to use SSL, you must configure the Fusion UI service for SSL. All requests to Fusion go through the Fusion UI service. This includes requests to the Fusion REST-API services, because the Fusion UI service contains the Fusion authentication proxy which controls user access permissions. Because the Fusion UI service (currently) uses the Jetty server, most of this post is about configuring the Jetty server for SSL. The Eclipse website provides a good overview and detailed instructions on configuring Jetty for SSL: http://www.eclipse.org/jetty/documentation/current/configuring-ssl.html

There are two conceptual pieces to the configuration puzzle:

  • SSL keypairs, certificates, and the JSEE keystore
  • Fusion UI service configuration

Puzzle Piece One: SSL Keypairs, Certificates, and the JSEE Keystore

In order to get started, you need a JSSE keystore for your application which contains an SSL keypair and a signed SSL certificate. The SSL protocol uses a keypair consisting of a publicly shared key and a private key which is never shared. The public key is part of the SSL certificate. The server’s keystore contains both the keypair and the certificate.

At the start of the session, the client and server exchange series a of messages according to the SSL Handshake protocol. The handshake process generates a shared random symmetric encryption key which is used for all messages exchanged subsequent to the handshake. During the initial message exchange, the server sends its SSL certificate containing its public key to the client. The next two turns of the conversation establish the shared symmetric key. Because of clever properties of the keypair, the client uses the public key to generate a message which can only be decrypted by the holder of the private key, thus proving the authenticity of the server. Since this process is computationally expensive, it is carried out only once, during the handshake; after that, the shared symmetric key is used with an agreed-on encryption algorithm, details of which are beyond the scope of this blog post. A nice overview of this process, with schematic, is available from this IBM docset. For the truly curious, I recommend reading this writeup of the math behind the handshake for non-mathematicians.

In addition to the public key, a certificate contains the web site name, contact email address, company information. Certificates are very boring to look at:

  Bag Attributes
      friendlyName: localhost
      localKeyID: 54 69 6D 65 20 31 34 35 35 38 34 30 33 35 36 37 37 35
  Key Attributes: <No Attributes>
  -----BEGIN RSA PRIVATE KEY-----
  Proc-Type: 4,ENCRYPTED
  DEK-Info: DES-EDE3-CBC,E2BCF2C42A11885A

  tOguzLTOGTZUaCdW3XzoP4xDPZACEayuncv0HVtNRR3PZ5uQNUzZaNX0OgbSUh5/
  /w6Fo7yENJdlTgMC4XafMRN+rTCfVj3XBsnOvQVj7hLiDq1K26XpvD79Uvb2B4QU
    ...  (omitting many similar lines) ...
  x3LI5ApQ2G2Oo3OnY5TZ+EYuHgWSICBZApViaNlZ4ErxXp1Xfj4iFtfi50hcChco
  poL9RdLpOx/CyLuQZZn5cjprIjDA3FcvmjBfOlmE+xm+eNMIKpS54w==
  -----END RSA PRIVATE KEY-----
  Bag Attributes
      friendlyName: localhost
      localKeyID: 54 69 6D 65 20 31 34 35 35 38 34 30 33 35 36 37 37 35
  subject=/C=NA/ST=NA/L=Springfield/O=some org/OU=some org unit/CN=firstname lastname
  issuer=/C=NA/ST=NA/L=Springfield/O=some org/OU=some org unit/CN=firstname lastname
  -----BEGIN CERTIFICATE-----
  MIIDqzCCApOgAwIBAgIEIwsEjjANBgkqhkiG9w0BAQsFADB4MQswCQYDVQQGEwJO
  QTELMAkGA1UECBMCTkExFDASBgNVBAcTC1NwcmluZ2ZpZWxkMREwDwYDVQQKEwhz
    ...  (omitting many similar lines) ...
  fALku9VkH3j7PidVR5SJeFzwjvS+KvjpmxAsPxyrZyZwp2qMEmR6NPjLjYjE+i4S
  04UG7yrKTm9CuElddLFAnuwaNAuifbbZ6P3BR3rFaA==
  -----END CERTIFICATE-----

Certificates are signed by a CA (Certificate Authority), either a root CA or an intermediate CA. Intermediate CAs provide enhanced security, so these should be used to generate the end user certificate.

You need to get a signed certificate and an SSL keypair from your sys admin and put it into the keystore used by the Fusion UI Jetty server. In a production environment, you will need to set up your keystore file in a secure location with the appropriate permissions and then configure the Fusion UI Jetty server to use this keystore. If you don’t have a signed SSL certificate, you can get a keystore file which contains an self-signed certificate suitable for development and demos by running the Jetty start.jar utility, details in the next section.

The Java keytool utility which is part of the JDK can be used to store the server certificate and private key in the keystore. There are several file formats used to bundle together the private key and the signed certificate. The most commonly used formats are PKCS12 and PEM. PKCS12 files usually have filename extension “.p12” or “.pfx” and PEM files usually have filename extension “.pem”. In a Windows environment, you will most likely have a “.pfx” file which contains both the private key and the signed certificate and can be uploaded into the keystore directly (see example below). In a *nix environment, if you have a bundle of certification files and a keypair file, you will have to use the openssl tool to create a PKCS12 file which can then be uploaded into the keystore via the keytool. Signed certificate files have suffix “.crt” and private key files have suffix “.key”, however you should always check to see whether these are binary files or if the contents are ascii, which are most likely already in the PEM format shown above.

The following example uses the Java keytool utility to create a new keystore named “my.keystore.jks” from the private key and signed certificate bundle “my.keystore.p12” which is in pkcs12 format. The keytool prompts for a keystore passwords for both the source and destination keystore files:

> keytool -importkeystore  \
> -srckeystore my.keystore.p12 \
> -srcstoretype pkcs12 \
> -destkeystore my.keystore2.jks \
> -deststoretype JKS

Enter destination keystore password:
Re-enter new password:
Enter source keystore password:
Entry for alias localhost successfully imported.
Import command completed:  1 entries successfully imported, 0 entries failed or cancelled

To check your work, you can use the keytool command “-list” option:

> keytool -list -keystore my.keystore2.jks

Enter keystore password:

Keystore type: JKS
Keystore provider: SUN

Your keystore contains 1 entry

localhost, Feb 18, 2016, PrivateKeyEntry,
Certificate fingerprint (SHA1): 63:1E:56:59:65:3F:83:2D:49:F1:AC:87:15:04:1A:E4:0C:E1:26:62

Puzzle Piece Two: Fusion UI Service Configuration

The Fusion UI service uses the Jetty server, which means that you must first configure the Fusion UI service Jetty server which is found in the Fusion directory apps/jetty/ui, and then change the port and protocol information in the Fusion UI service start script which is found in the Fusion directory bin.

Jetty Server Configuration

The configuration files for Fusion services which run on the Jetty server are found in the Fusion distribution directory apps/jetty. The directory apps/jetty/ui contains the Jetty server configured to run the Fusion UI service for the default Fusion deployment. The directory apps/jetty/home contains the full Jetty distribution.

The following information is taken from the http://www.eclipse.org/jetty/documentation/current/quickstart-running-jetty.html#quickstart-starting-https documentation.

The full Jetty distribution home directory contains a file “start.jar” which is used to configure the Jetty server. The command line argument “–add-to-startd” is used to add additional modules to the server. Specifying “–add-to-startd=https” has the effect of adding ini files to run an ssl connection that supports the HTTPS protocol as follows:

  • creates start.d/ssl.ini that configures an SSL connector (eg port, keystore etc.) by adding etc/jetty-ssl.xml and etc/jetty-ssl-context.xml to the effective command line.
  • creates start.d/https.ini that configures the HTTPS protocol on the SSL connector by adding etc/jetty-https.xml to the effective command line.
  • checks for the existence of a etc/keystore file and if not present, downloads a demonstration keystore file.

Step 1: run the start.jar utility

To configure the Fusion UI service jetty server for SSL and HTTPS, From the directory apps/jetty/ui, run the following command:

> java -jar ../home/start.jar --add-to-startd=https

Unless there is already a file called “keystore” present, this utility will install a local keystore file that contains a self-signed certificate and corresponding keypair which can be used for development and demo purposes. In addition, it adds files “http.ini” and “ssl.ini” to the local “start.d” subdirectory:

> ls start.d
http.ini        https.ini       ssl.ini

This set of “.ini” files determines the Jetty control the configuration of the server. These files are Java properties files that are used to configure the http, https, and ssl modules. In the default Fusion distribution, the directory apps/jetty/ui/start.d only contains the file “http.ini”, so the Fusion UI service runs over HTTP. The HTTPS module requires the SSL module, so “.ini” files for both are added.

Step 2: edit file start.d/ssl.ini

The “.ini” files are Java property files. As installed, the “ssl.ini” file is configured to use the demonstration keystore file. This is convenient if you are just trying to do a local install for development purposes, and is especially convenient if you don’t yet have the requisite certification bundles and keystore – at this point, your configuration is complete. But if you have a real keystore, you’ll need to edit all keystore-related properties in the “ssl.ini” file:

### SSL Keystore Configuration

## Setup a demonstration keystore and truststore
jetty.keystore=etc/keystore
jetty.truststore=etc/keystore

## Set the demonstration passwords.
## Note that OBF passwords are not secure, just protected from casual observation
## See http://www.eclipse.org/jetty/documentation/current/configuring-security-secure-passwords.html
jetty.keystore.password=OBF:1vny1zlo1x8e1vnw1vn61x8g1zlu1vn4
jetty.keymanager.password=OBF:1u2u1wml1z7s1z7a1wnl1u2g
jetty.truststore.password=OBF:1vny1zlo1x8e1vnw1vn61x8g1zlu1vn4

Note the obfuscated passwords – use the tool mentioned above: http://www.eclipse.org/jetty/documentation/current/configuring-security-secure-passwords.html to obfuscate, checksum, or encrypt passwords.

Step 3 (optional): disable use of HTTP

You can entirely disable use of HTTP by removing the HTTP connector from the jetty startup configuration:

> rm start.d/http.ini

Fusion UI Service Configuration

The Fusion UI service startup script is found in the Fusion distribution bin directory, in files bin/ui and bin/ui.cmd, for *nix and Windows respectively. It sets a series of environment variables and then starts the Jetty server. The arguments to exec command to start the Jetty server require one change:
change the command line argument from “jetty.port=$HTTP_PORT” to “https.port=$HTTP_PORT”

The UI service startup script is called from the main start script bin/fusion. Once Fusion startup is complete, you should be able to access it securely in the browser via the HTTPS protocol (see initial screenshot above). If the server is using a self-signed certificate, both Firefox and Chrome browsers will issue warnings requiring you to acknowledge that you really want to trust this server. The Chrome browser also flags sites using a self-signed certificate by displaying a warning icon instead of the secure lock icon:

chrome warning

Discussion

SSL is the seatbelt required for cruising the information highway: before sending your data to some remote server, buckle up! Future releases of Fusion will provide even more security in the form of “SSL everywhere”, meaning that it will be possible to configure Fusion’s services so that all traffic between the components will be encrypted, keeping your data safe from internal prying eyes.

SSL provides data security at the transport layer. Future posts in this series will cover:

  • Security at the application layer, using Fusion’s fine-grained permissions
  • Security at the document layer with MS Sharepoint security-trimming
  • Fusion and Kerberos

The post Secure Fusion: SSL Configuration appeared first on Lucidworks.com.

2015 Solr Developer Survey

$
0
0

The results are in! We’ve got the results of the 2015 Solr Developer Survey – thank you to everyone that participated. It really helps us see a snapshot in time of the vibrant Solr community and how developers all over the world are doing amazing things with Apache Solr.

Basic Demographics

We kicked off the survey asking some basic demographic questions education, salary, industry, etc.

Most developers work full-time in technology/telecom and have a graduate-level education. More details below:

developer-survey-charts-2015.001 developer-survey-charts-2015.002 developer-survey-charts-2015.003 developer-survey-charts-2015.004 developer-survey-charts-2015.005

Location

Not surprisingly, most of our developers surveyed live in the United States with India a close second. Germany, UK, Italy, and France following after that.

developer-survey-charts-2015.008 

Version of Solr

We’re always curious about this one: Who is still working with older versions of Solr? It’s good to see Solr 4 at the head of the pack – with some developers still having to create or maintain apps built on Solr 1.4 (released back in November of 2009). developer-survey-charts-2015.007

Connectors and Data Sources

Before you can search your data you’ve got to get it into your Solr index. We asked the Solr developer community what connectors they relied on most for bringing their data sources into their Solr instance ready for indexing. MySQL and local filesystems like internal network drives and other resources were at the top – no surprise there. Other database technologies rounded out the top data sources with Amazon S3, the public web, and Hadoop all making an appearance.

developer-survey-charts-2015.009

Authentication, Security, and Redaction

Security is paramount when building search-driven applications that are created for a larger user base. The most popular authentication protocols are pretty much standard across the board for most developers: LDAP, Kerberos, and Active Directory.

developer-survey-charts-2015.010

We also wanted to know what levels and complexity of security that developers were using to block users from viewing unauthorized content. 40% said that they had no level of security – which is more than a little distressing. About the same amount had deployed document level security within a search app with other levels and methods following:

developer-survey-charts-2015.011

UI Frameworks

It’s always a thorny topic asking developers what frameworks they are using for their application. No surprise to see jQuery at the top with AngularJS.developer-survey-charts-2015.012

Query Types

The survey also included a question to gauge the level of sophistication of query types apps that developers were including in their Solr apps. Text and keyword search was obvious and remains the foundation of most search projects. It was good to see representation for semantic and conceptual search becoming more prominent. And as mobile devices continue to take over the world, spatial and geo-specific search is more important than ever in helping users find people, resources, products, and services, and search results that are around where they are right now.

developer-survey-charts-2015.013

ETL Pipelines and Transformations at Indexing Time

We also wanted to know a little about what types of transformations Solr apps were performing at indexing time. The top transformations were pretty common across those surveyed –  at between 40% and 60% – included synonym identification, content extraction, metadata extraction and enrichment, named entity classification, taxonomies and ontologies. Sentiment analysis and security enrichment were less common.

developer-survey-charts-2015.014

ETL Pipelines and Transformations at Query Time

Transformations can also take place on the query side – as a query is sent by the user to the app and the list of results is returned to the user. Faceting, auto-suggest, and boost/block were in use by nearly half of the applications that developers were working on. Expect to see user feedback signals move up the chain as more search applications start aggregating user behavior to influence search results for an individual user, a particular cohort, or across the entire user base.

developer-survey-charts-2015.015

 Big Data Integrations

Solr plays well with others so we wanted to get a sense of what big data libraries and modules developers are adding to the mix. Storage and scalability workhorse Hadoop was part of the picture for over half of devs surveyed with Mongo and Spark in 1/3. Familiar faces like Cassandra, HBase, Hive, and Pig rounded out the less popular modules.

developer-survey-charts-2015.016

Custom Coding

And finally we wanted to know the kind of blood, sweat, and tears being poured into custom development. When you can’t find a library or the module that you need what do you do?

developer-survey-charts-2015.017

And that’s the end of our 2015 developer survey.

Thank you to everyone who participated and we’ll see ya in late 2016 to do an update!

The post 2015 Solr Developer Survey appeared first on Lucidworks.com.

Google Search Appliance’s End of Life – End of an Era

$
0
0

As search practitioners, we have always admired Google and all the work they’ve done to redefine and advance the search paradigm. Going beyond basic results retrieval, Google has transformed our expectations when it comes to the data experience. The most frequent complaint we hear from customers as it pertains to their data-driven applications is that apps should behave more Google-like. In some instances, this means basic natural language search across data in sources like relational databases. In other instances, the results that users get returned need higher relevancy and rarely provide a personal, contextual, or even useful experience.

Google Search Appliance launched in 2002 and brought the seamless delivery of natural language search to organizations looking to provide access to all of their data – to both employees or customers. These slick yellow boxes were easy to deploy and offered immediate results. While this solution was a quick win for those looking to solve department-level needs or basic website search, it did not provide actual Google-quality search compared to what we see on google.com every day. GSA left much to be desired in terms of the ability to fine-tune the relevancy experiences based on an organization’s unique needs and mix of data sources. These boxes also became cumbersome when it came to scaling. Our customers would typically look to migrate off GSA when their relevancy needs reached a certain critical mass or the need to scale to multiple search applications throughout the organizations became an imperative.

As Google pushes their enterprise focus into the cloud, they have announced the end-of-life of GSA leaving many customers in a lurch. While no actual alternative or replacement has been announced, their intentions to migrate GSA customers to the cloud have been made crystal clear. This announcement has created a forcing function for many organizations to re-evaluate their search needs going forward. Many companies have already chosen Lucidworks Fusion as the next step in their search journey as they outgrew the capabilities of GSA.

Here are a few of the main reasons companies have made the switch from Google Search Appliance to Lucidworks Fusion:

Higher Relevancy

Relevancy is one of the most critical factors in creating a productive and happy user experience. We are no longer compelled to rifle through results or even scroll down. Subject matter experts have to have capabilities to fine-tune the search experience based on their expertise or user behavior. These SMEs are often non-technical and need relevancy tools that are useful and easy to understand.

Fusion puts relevancy firmly in the control of the application owner with a rich UI for tuning result relevancy and the configuring and enforcement of business rules. Advanced relevancy tools enable admins to calibrate fine-grained relevancy tuning and inspection. Pipeline setup and management enables you to conduct relevancy experiments for comparing, analyzing, and optimizing outcomes.

To advance this concept a step further, Fusion’s signal processing capability captures and aggregates user behaviors and other signals (likes, reviews, credentials etc.) to automatically and dynamically rank results. This same facility can proactively deliver recommendations to users based on their personal preferences, location, and past activity. Developers can go beyond the cumbersome nature of rules management and deliver a more intelligent and powerful data experience.

Data Independence

Apache Solr is the leader in open source search with thousands of deployments across the Fortune 1000. While interest in open source search is high, engineering orgs struggle with building and maintaining the functionality to deliver search apps that run on-top of the open source stack and then also can handle the speed and complexity the business demands. The attraction to open source stems from the desire organizations have to store data independently of a vendor’s solution.

Fusion has all of the advanced feature set and capabilities needed to develop and deploy rich search-driven applications. These features run directly on-top of open source Apache Solr where the data is stored. Users have complete access and control over the data store so applications can take advantage of all the benefits of open source search while reducing the time to market and increasing value of a commercial search solution.

Cost Effective at Scale

In addition to the cost and overhead of maintaining the physical boxes, Google Search Appliance is priced by the number of documents in your collections. So as the amount of data and documents grows, so do your licensing costs.

We decided to price Fusion per node so you can scale to billions of documents while containing costs and reducing your hardware footprint. This allows organization’s to scale applications without the threat of uncontrollable hardware and maintenance costs. Leveraging Apache Solr keeps our focus on developing rich features and functionality for your developers – not punishing you for pushing the limits of search throughout your organization.

Wherever you are in your search journey we encourage you to think about your users first. Data experience is the new user experience and with Lucidworks Fusion you can deliver the most powerful search-driven applications every time.

Interested in talking to one of our GSA Migration Specialists? Contact us today or download Fusion.

The post Google Search Appliance’s End of Life – End of an Era appeared first on Lucidworks.com.

Secure Fusion Part Two: Authentication and Authorization

$
0
0

This is the second in a series of articles on securing your data in Lucidworks Fusion. Here’s Part One.

This post covers Fusion’s basic application-level security mechanisms. At the application layer, Fusions delivers security via:

  • Authentication – users must sign on using a username and password.
  • Authorization – each username is associated with one or more permissions which specify the Fusion REST-API requests they have access to. Permissions can be restricted to specific endpoints and path parameters.

Fusion stores this information in Apache ZooKeeper, (heeding the advice in this post on how and why to use ZooKeeper). ZooKeeper keeps this information secure and always available to all Fusion components across the deployment.

Users and Realms

A realm in a Java EE application is a complete database of users and groups which are controlled by the same kind of authentication. A realm is specified as part of an HTTP request during basic authentication. In Fusion, this information is encapsulated by a Security Realm, defined by a unique ID, realm name, and the type of the authentication handling mechanism.

Fusion can be configured for the following realm types:

  • Native – Fusion manages all authentication and permissions information directly. Fusion user accounts are created and managed either using the Fusion UI or the REST-API. The entire user database is stored in ZooKeeper. Stored passwords are encrypted using bcrypt, the strongest possible encryption algorithm available to all JDKs. The native realm is the home of the Fusion admin user and is the default realm type.
  • LDAP – Fusion stores a local user record in ZooKeeper, and authentication is performed by the LDAP server. The Fusion user id maps directly to the LDAP Distinguished Name (DN).
  • Kerberos – Fusion stores a local user record in ZooKeeper and a mapping to the Kerberos principal. SPNEGO is used for authentication via Kerberos.

This post only covers authentication and user management in Fusion’s native security realm. Upcoming posts will cover LDAP and Kerberos security realms.

Authentication: Members Only

Fusion logins require a username, password, and authentication realm. Usernames are unique within a realm. Fusion creates a globally unique user ID for all users based on the combination of username and realm.

In the Fusion UI, the login screen provides a pulldown menu for all configured security realms. If no other security realms have been configured, the only choice is the “native” realm.

login native realm

The system administrator account belongs to the Fusion native realm. On initial startup, the first UI panel displayed is the “set admin password” panel:

set admin password

You must fire up the Fusion UI to set the admin user password in order to get started with Fusion. Setting the password creates the account, otherwise you have a system with no user accounts in it, which makes it impossible to create a properly authorized request: no authorization, no service.

Once the password has been validated, Fusion registers the “admin” account in ZooKeeper. The admin user has all system privileges; when logged in as admin you have access to all data and configuration information. This is sometimes convenient for preliminary development on an isolated machine, but in a production environment, there should be least as many user accounts as there are different types of users.

If your search application requires search over a collection with document-level security via ACLs, then you need to create a user account for all the users who can access those documents. This can be done in conjunction with LDAP or by creating Fusion users in the native realm directly. For the latter situation you must make sure that: the user names match up with the ACLs on the documents; and the datasource used for indexing is configured to index the ACLs along with the document contents. If you don’t have document-level security, then you would only need to define as many user accounts as you have user types.

Authorization via Roles and Permissions: To Each According to Their Needs

Fusion permissions specify access to the Fusion REST-API endpoints. Whenever a user makes a request, Fusion’s authorization mechanism uses the unique user id to get the user permissions from the appropriate realm.

The Fusion REST-API service User is used to create and manage user permissions. A user with full permissions for the User service can create and manage user accounts. To bootstrap this process, Fusion creates the admin user at initial startup. To manage user accounts from the Fusion UI, from the top-menu bar “Applications” pulldown menu choose entry “Access Control”:

access controls

The Access panel has three subpanels: “USERS”, “ROLES”, and “SECURITY REALMS”. User accounts are created via the “USERS” subpanel “Add User” button:

create user

The following information is required in order to create a new user account: username, realm, and password. All other information is optional, however, unless a user has one or more permissions, they cannot do anything at all in Fusion.

A permissions specification consists of two or three pieces of information:

  • HTTP request methods allowed.
  • REST-API services endpoint, which can contain wildcards or named variables.
  • Allowed values for any named variables in the endpoint.

Permissions specifications are coded up as a string using the colon character “:” as the separator between the permission elements:

  • The methods specification lists the allowed HTTP method or methods, separated by commas.
  • The endpoint can include wildcards. The wildcard symbol ‘*’ matches all possible values for a single path fragment and two wildcards match all possible values for any number of path fragments. A path fragment can be a named variable enclosed in curly braces: “{variable-name}”. Variables are used when a wildcard would be too permissive and a single path fragment too restrictive.
  • The variable specification component specifies the restricted value or values for all named variables in the path. Each specification consists of the variable name, followed by “=” (the equals sign), followed by one or more values which are separated by commas. If the endpoint specification has multiple variable, the semi-colon character “;” is used as the separator between parameter specifications.

The following are examples of permission specifications and what they do:

  • GET:/query-pipelines/*/collections/*/select – search access to any Fusion collection.
  • GET,PUT:/collections/Collection345/synonyms/** – permission to edit synonyms for collection named “Collection345”.
  • GET:/collections/{id}:id=Collection345,Collection346 – read access to collections named “Collection345” and “Collection346”.

Wildcards make it easy to give wide access to Fusion services. The permissions for the admin user can be written in a single line:

GET,POST,PUT,DELETE,PATCH,HEAD:/**

Restricting access to a subset of Fusion’s functionality requires a list of narrowly defined permissions. In order to facilitate this process, Fusion provides “Roles” which are named sets of permissions. These are managed via “ROLES” panel of the “Access” controls:

create roles

At initial startup, Fusion creates the following named roles:

  • admin – superuser role – access to everything, permissions specification above.
  • collection-admin – read/write access to all query pipelines/stages and collections and read access to all reports and connectors.
  • search – read-only access to collections and permissions needed to access the Fusion Search UI.
  • ui-user – access to the Fusion UI for information only, also allows user to change their password.

To see how different permissions work, while logged in a the admin user, I create a new user with username “demo-search-user” and with permissions for the “search” role:

create user

Next I logout as admin and log in a “demo-search-user”. When logged in “demo-search-user”, the only choice on the “Applications” menu is “collections”. When viewing a collection, the “Home” menu contains no options; the only thing this user can do is run searches from the Search panel.

demo-search-user apps

The search user can run searches, but there is no available role for a data-analyst user who wants to use Fusion’s dashboards. To show how to create a very limited set of permissions for a specific user, I’ll define a role named “dashboards-collection-test” which allows a user to access Fusion dashboard for a collection named “test”. The permissions are:

  • GET:/solr/{id}/*:id=test– read-only access to collection named “test”
  • GET:/solr/{id}/admin/luke:id=test – also read-only access
  • GET:/solr/system_banana/* – read-only access to dashboards
  • GET:/collections/system_banana – read-only access to collection where dashboard definitions are stored

From the “ROLES” panel, I create the role “dashboards-collection-test” with the above permissions:

demo-search-user apps

Next I create a user named “demo-dashboard-user”. This user has role “dashboards-collection-test” and also has access to the UI dashboards and no other roles or UI access. When logged in a “demo-dashboard-user”, main UI panel is blank and the only choice on the application menu is “dashboards”.

demo-dashboard-user apps

I can create a non-timeseries dashboard over collection “test”:

dashboard created

Attempts to save this dashboard back to Solr fail because this role grants read-only access.

Authentication and Session Cookies

When Fusion receives a login request, it authenticates the user by fetching their encrypted password from ZooKeeper and doing a password-hash comparison. Because this is computationally expensive, upon successful authentication, the Fusion UI automatically creates a session cookie which contains the unique user id. This cookie is used the rest of the browser session, although it will expire after 45 minutes of inactivity.

All requests to the Fusion REST-API require either a username and password pair or the session cookie which contains the unique user id. For applications which send requests to the Fusion REST-API, the Fusion UI service endpoint “api/session” can be used to generate this cookie via a POST request whose body consists of a JSON object which contains the username, password information. When you’re running Fusion over SSL, these passwords are securely encrypted as they go across the wire. (If you’re not running Fusion over SSL, please see the previous post in this series to remedy this.)

To see how to generate and use session cookies, we use the the curl command-line tool. The command to generate a session cookie for the admin user with password “password123” is:

curl \
 -c cookie -i -X POST -H "Content-type:application/json" -d @- -k \
 https://localhost:8764/api/session \
<<EOF
 { "username" : "admin" , "password" : "password123" }
EOF

The curl command takes any number of specialized arguments, followed by the URL of the request endpoint. For those of you that don’t speak fluent curl, here is what each part of the above incantation does:

  • -c : filename of cookies file. If it exists, cookies are added to it. You can use -c - which writes to the terminal window (std out).
  • -i : include the HTTP-header in the output. Used here to see the cookie returned with the response.
  • -X : request method, in this case POST
  • -H : request header. The api/session endpoint requires Content-type:application/json.
  • -d : Pass POST body as part of the command-line request. To get ready the body from a file, use the syntax -d @<filename>. The argument -d @- reads the data from stdin.
  • -k : insecure mode – this turns off verification of the server’s SSL certificate. This is necessary for this example because the server is using a self-signed certificate.
  • <URL> : request URL – https://localhost:8764/api/session, since Fusion is running locally and is configured for SSL.

The final lines contains the POST body data which is the JSON object containing the username, password pair. The argument -d @- directs curl to read the data from stdin. The shell heredoc format takes all text between the line “<<EOF” and the terminating line “EOF” and sends it to stdin. This lets you specify all arguments, including the request URL, before typing all all the POST data. If, like me, you sometimes forget to include the URL after all the data, use heredoc.

The header output shows the cookie information:

HTTP/1.1 201 Created
Set-Cookie: id=996e4adf-bd04-4058-a926-8ea8ca08c05a;Secure;HttpOnly;Path=/api
Content-Length: 0
Server: Jetty(9.2.11.v20150529)

The cookie information in the header matches the information in the cookie file:

> cat cookie

# Netscape HTTP Cookie File
# http://curl.haxx.se/docs/http-cookies.html
# This file was generated by libcurl! Edit at your own risk.

#HttpOnly_localhost     FALSE   /api    TRUE    0       id      996e4adf-bd04-4058-a926-8ea8ca08c05a

Once the session cookie file has been created, it can be sent along in all subsequent requests to the REST-API. For the curl command-line client, the -b flag is used to send the contents of the cookie file to the server along with the request.

The following command sends a GET request to the Fusion REST-API Collections service to check the status of the “system_metrics” collection. The -b flag sends in a freshly generated session cookie. As before, the -k flag is required since the SSL Fusion is using a self-signed certificate:

> curl -b cookie -i -k https://localhost:8764/api/apollo/collections/system_metrics

HTTP/1.1 200 OK
Content-Type: application/json; charset=utf-8
Content-Encoding: gzip
Vary: Accept-Encoding, User-Agent
Content-Length: 278
Server: Jetty(9.2.11.v20150529)

{
  "id" : "system_metrics",
  "createdAt" : "2016-03-04T23:29:47.779Z",
  "searchClusterId" : "default",
  "commitWithin" : 10000,
  "solrParams" : {
    "name" : "system_metrics",
    "numShards" : 1,
    "replicationFactor" : 1
  },
  "type" : "METRICS",
  "metadata" : { }
}

If the session cookie has expired, the system returns a 401 Unauthorized code:

> curl -b cookie -i -k https://localhost:8764/api/apollo/collections/system_metrics

HTTP/1.1 401 Unauthorized
Content-Type: application/json; charset=utf-8
Content-Length: 31
Server: Jetty(9.2.11.v20150529)

{"code":"session-idle-timeout"}

Discussion

Fusion provides security at the data transport layer via HTTPS and SSL. Secure Fusion Part One: SSL Configuration explains how this works and shows you how to configure Fusion for SSL. This ensures that data sent to and from Fusion is securely encrypted which prevents intermediate servers from accessing your data.

In this post, we’ve seen how Fusion’s authentication and permissions work in tandem to protect your data from unauthorized access, and how to manage user accounts and permissions directly in Fusion. As a practical example, we show how to configure Fusion to give a user read-only access to Fusion’s data analytics Dashboards for a specific collection. As a bonus, we show how manage session cookies for speedy authentication.

Upcoming blog posts will show how Fusion can be configured to get the user names, passwords, and group memberships of the security mechanism of the domain in which Fusion is being run, thus ensuring the data ingested into Fusion retains the same levels of access and protection as it has in the source repository.

The post Secure Fusion Part Two: Authentication and Authorization appeared first on Lucidworks.com.


Secure Fusion: Leveraging LDAP

$
0
0

This is the third in a series of articles on securing your data in Lucidworks Fusion. Secure Fusion: SSL Configuration covers transport layer security and Secure Fusion: Authentication and Authorization covers general application-level security mechanisms in Fusion. This article shows you how Fusion can be configured to use an LDAP server for authentication and authorization.

Before discussing how to configure Fusion for LDAP, it’s important to understand when and why to do this. Given that Fusion’s native security realm can manage authentication and passwords directly, why bother to use LDAP? And conversely, if you can use LDAP for authentication and authorization, why not always use LDAP?

The answer to the latter question is that Fusion’s native security realm is necessary to bootstrap Fusion. Because all requests to Fusion require authentication and authorization, you must start building a Fusion application by first logging in as the native user named “admin”. Built-in authentication provides a fallback mechanism in case of LDAP server or communication failure.

Why use LDAP? Using LDAP simplifies the task of user administration. Individual user accounts are managed directly by LDAP. Access to services and data is managed by mapping LDAP users and groups to Fusion roles and permissions.

A common use case for an LDAP security realm is for search over a collection of documents with ACLs that restrict access to specific users or groups, e.g. indexing a MS Sharepoint repository managed by Active Directory. In order to make sure that search respects the access permissions on these documents, when indexing those documents, you must the access permissions as well as the document contents. At query time, the user account information sent along with the search query and Fusion restricts the search results set to only those documents that the user is allowed to access.

LDAP for Noobs

If you understand LDAP and are comfortable configuring LDAP-based systems, you can skip this section and go to section Fusion Configuration.

The LDAP protocol is used to share information about users, systems, networks, and services between servers on the internet. LDAP servers are used as a central store for usernames, passwords, and user and group permissions. Applications and services use the LDAP protocol to send user login and password information to the LDAP server. The server performs name lookup and password validation. LDAP servers also store Access Control Lists (ACLs) for file and directory objects which specify the users and groups and kinds of access allowed for those objects.

LDAP is an open standard protocol and there are many commercial and open-source LDAP servers available. Microsoft environments generally use Active Directory. *nix servers use AD or other LDAP systems such as OpenLDAP, although many *nix systems don’t use LDAP at all. To configure Fusion for LDAP, you’ll need to get information about the LDAP server(s) running on your system either from your sysadmin or via system utilities.

Directories and Distinguished Names

An LDAP information store is a Directory Information Tree (DIT). The tree is composed of entry nodes; each node has a single parent and zero or more child nodes. Every node must have at least one attribute which uniquely distinguishes it from its siblings which is used as the node’s Relative Distinguished Name (RDN). A node’s Distinguished Name (DN) is a globally unique identifier.

The string representation of a DN is specified in RFC 4514. It consists of the node’s RDN followed by a comma, followed by the parent node’s DN. The string representation of the RDN is the attribute-value pair name, connected by an equals (“=”) sign. This recursive definition means that the DN of a node is composed by working from the node back through its parent and ancestor nodes up to the root node.

Here is a small example of a DIT:

example

The person entry in this tree has the DN: “uid=babs, ou=people, dc=example, dc=com”.

Attribute names include many short strings based on English words and abbreviations, e.g.:

Name Description

cn

commonName

dc

domainComponent

mail

email address

ou

organizationalUnitName

sn

surname

uid

userId

LDAP entry attributes can refer to other LDAP entries by using the DN of the entry as value of that attribute. The following example of a directory which contains user and groups information shows how this works:

example 2

This tree contains two organizational units: “ou=people” and “ou=groups”. The children of the “group” organizational unit are specific named groups, just as the child nodes of organization unit “people” are specific users. There are three user entries with RDNs “uid=bob”, “uid=alice”, “uid=bill” and two groups with RDNs “cn=user” and “cn=admin”. The dotted lines and group labels around the person nodes indicates group membership. This relationship is declared on the groups nodes by adding an attributes named “member” whose value is a users DN. In the LDAP data interchange format (LDIF), this is written:

cn=user,ou=groups,dc=acme,dc=org
    member: uid=bob,ou=people,dc=acme,dc=org
    member: uid=alice,ou=people,dc=acme,dc=org
cn=admin,ou=groups,dc=acme,dc=org
    member: uid=bill,ou=people,dc=acme,dc=org

See the Wikipedia’s LDAP entry for details.

LDAP Protocol Operations

For authentication purposes, Fusion sends Bind operation requests to the LDAP server. The Bind operation authenticates clients (and the users or applications behind them) to the directory server, establishes authorization identity used for subsequent operations on that connection, and specifies the LDAP protocol version that the client will use.

Depending on the way that the host system uses LDAP to store login information about users and groups, it may be necessary to send Search operation requests to the LDAP server as well. The Search operation retrieves partial or complete copies of entries matching a given set of criteria.

LDAP filters specify which entries should be returned. These are specified using prefix notation. Boolean operators are “&” for logical AND, “|” for logical OR, e.g., “A AND B” is written “(&(A)(B))”. To tune and test search filters for a *nix-based LDAP system, see the ldapsearch command line utility documentation. For Active Directory systems, see AD Syntax Filters.


Fusion Configuration for an LDAP Realm

To configure Fusion for LDAP, you’ll need to get information about the LDAP server(s) running on your system, either from your system or your sysadmin.

To configure an LDAP realm from the Fusion UI, you must be logged in as a user with admin-level privileges. From the “Applications” menu, menu item “Access Control”, panel “Security Realms”, click on the “Add Security Realm” button:

add new realm

This opens an editor panel for a new Security Realm, containing controls and inputs for all required and optional configuration information.

Required Configuration Step One: Name and Type

The first step in setting up an LDAP security realm is filling out the required information at the top of the realm config panel:

choose name

The first three required configuration items are:

  • name – must be unique, should be descriptive yet short
  • type – choice of “LDAP” or “Kerberos”
  • “enabled” checkbox – default is true (i.e., the box is checked). The “enabled” setting controls whether or not Fusion allows user logins for this security realm.

Required Configuration Step Two: Server and Port

The name and port of the LDAP server are required, along with whether or not the server is running over SSL. In this example, I’m configuring a hypothetical LDAP server for company “Acme.org”, running a server named “ldap.acme.org” over SSL, on port 636:

connection details

Required Configuration Step Three: Authentication Method and DN Templates

Next, you must specify the authentication method. There are three choices:

  • Bind – the LDAP authentication operation is carried out via a single “Bind” operation.
  • Search – LDAP authentication is carried out indirectly via a Search operation followed by a Bind operation.
  • Kerberos – Kerberos authenticates Fusion and an LDAP Search operation is carried out to find group-level authorizations.

The Bind authentication method is used when the Fusion login username matches a part of the LDAP DN. The rest of the LDAP DN is specified in the “DN Template” configuration entry, which uses a single pair of curly brackets (“{}”) as a placeholder for the value of the Fusion username.

The Search authentication method is used when the username used for Fusion login doesn’t match a part of the LDAP DN. The search request returns a valid user DN, which is used together with the user password for authentication via a Bind request.

The Search authentication method is generally required when working with Microsoft Active Directory servers. In this case, you need to know the username and password of some user who has sufficient privileges to query the LDAP server for user and group memberships; this user doesn’t have to be the superuser. In addition to a privileged user DN and password, the Search authentication method requires crafting a search request. There are two parts to the request: the first part is the base DN of the LDAP directory tree which contains user account objects. The second part of the request is a Search Filter object which restricts the results to a matching subset of the information.

As a simple example, I configure Fusion for acme.org’s Linux-based LDAP server via the Bind authentication method:

DN template

In the LDAP directory example for organization “acme.org” above, the DNs for the three nodes in the “people” organizational unit are: “uid=bob,ou=people,dc=acme,dc=org”, “uid=alice,ou=people,dc=acme,dc=org”, and “uid=bill,ou=people,dc=acme,dc=org”. This corresponds to the DN Template string:

uid={},ou=people,dc=acme,dc=org

Testing the Configured Connection

The last part of the form allows you to test the LDAP realm config using a valid username and password:

test connection

When the “Update and test settings” button is clicked, the username from the form is turned into a DN according to the DN template, and a Bind operation request is sent to the configured LDAP server. Fusion reports whether or not authentication was successful:

test success

Optional Configuration: Roles and Groups Mappings

A Fusion role is a bundle of permissions tailored to the access needs of different kinds of users. Access to services and data for LDAP-managed users is controlled by mappings from LDAP users and groups to Fusion roles.

Roles can be assigned globally or restricted to specific LDAP groups. The security realm configuration panel contains a list of all Fusion roles with a checkbox for each, used to assign that role to all users in that realm. LDAP group names can be mapped directly to specific Fusion roles and LDAP group search and filter queries can also be used to map kinds of LDAP users to specific Fusion roles.

Putting It All Together

To see how this works, while logged as the Fusion native realm admin user, I edit the LDAP security realm named “test-LDAP” so that all users from this realm have admin privileges:

Fusion roles

At this point my Fusion instance contains two users:

two users

I log out as admin user:

admin logout

Now I log in using the “test-LDAP” realm:

login

Because all users from “test-LDAP” realm have admin privileges, I’m able to use the Access Controls application to see all system users. Checking the USERS panel again, I see that there’s now a new entry for username “mitzi.morris”:

three users

The listing for username “mitzi.morris” in the USERS panel doesn’t show roles, API or UI permissions because this information isn’t stored in Fusion’s internal ZooKeeper. The only information stored in Fusion is the username, realm, and uuid. Permissions are managed by LDAP. When the user logs in, Fusion’s LDAP realm config assigns roles according to the user’s current LDAP status.

Fusion manages all of your Solr data. Fusion’s security mechanisms ensure that only your users see all of their data and only their data, no more, no less. This post shows you how Fusion can be configured to use an external LDAP server for authentication and how to map user and group memberships to Fusion permissions and roles. Future posts in this series will show how to configure Fusion datasources so that document-level permissions sets (ACLs) are indexed
and how to configure search pipelines so that the results set contains only those documents that the user is authorized to see.

The post Secure Fusion: Leveraging LDAP appeared first on Lucidworks.com.

Apache Solr 6 Is Released! Here’s What’s New:

$
0
0

Happy Friday – Apache Solr 6 just released! 

From the official announcement:

“Solr 6.0.0 is available for immediate download at: http://lucene.apache.org/solr/mirrors-solr-latest-redir.html

“See the CHANGES.txt

“Solr 6.0 Release Highlights:

  • Improved defaults for “Similarity” used in Solr, in order to provide better default experience for new users.

  • Improved “Similarity” defaults for users upgrading: DefaultSimilarityFactory has been removed, implicit default Similarity has been changed to SchemaSimilarityFactory, and SchemaSimilarityFactory has been modified to use BM25Similarity as the default for field types that do not explicitly declare a Similarity.

  • Deprecated GET methods for schema are now accessible through the bulk API. The output has less details and is not backward compatible.

  • Users should set useDocValuesAsStored=”false” to preserve sort order on multi-valued fields that have both stored=”true” and docValues=”true”.

  • Read the full list of highlights

Want a walk-through of what’s new? Here’s Cassandra Target’s webinar:

The post Apache Solr 6 Is Released! Here’s What’s New: appeared first on Lucidworks.com.

Introducing Lucidworks View!

$
0
0

Lucidworks is pleased to announce the release of Lucidworks View.

View is an extensible search interface designed to work with Fusion, allowing for the deployment of an enterprise-ready search front end with minimal effort. View has been designed to harness the power of Fusion query pipelines and signals, and provides essential search capabilities including faceted navigation, typeahead suggestions, and landing page redirects.

lucidworks-view-batman

View showing automatic faceted navigation:

image01

View showing typeahead query pipelines, and the associated config file on the right:

image02

View is powered by Fusion, Gulp, AngularJS, and Sass allowing for the easy deployment of a sophisticated and customized search interface. All visual elements of View can be configured easily using SCSS styling.

View is easy to customize.. quickly change styling with a few edits:

image00

Additional features:

  • Document display templates for common Fusion data sources.
  • Included templates are web, file, Slack, Twitter, Jira and a default.
  • Landing Page redirects.
  • Integrates with Fusion authentication.

Lucidworks View 1.0 is available for immediate download at http://lucidworks.com/products/view

Read the release notes or documentation, learn more on the Lucidworks View product page, or browse the source on GitHub,

The post Introducing Lucidworks View! appeared first on Lucidworks.com.

Better Feature Engineering with Spark, Solr, and Lucene Analyzers

$
0
0

This blog post is about new features in the Lucidworks spark-solr open source toolkit. For an introduction to the spark-solr project, see Solr as an Apache Spark SQL DataSource

Performing text analysis in Spark

The Lucidworks spark-solr open source toolkit now contains tools to break down full text into words a.k.a. tokens using Lucene’s text analysis framework. Lucene text analysis is used under the covers by Solr when you index documents, to enable search, faceting, sorting, etc. But text analysis external to Solr can drive processes that won’t directly populate search indexes, like building machine learning models. In addition, extra-Solr analysis can allow expensive text analysis processes to be scaled separately from Solr’s document indexing process.

Lucene text analysis, via LuceneTextAnalyzer

The Lucene text analysis framework, a Java API, can be used directly in code you run on Spark, but the process of building an analysis pipeline and using it to extract tokens can be fairly complex. The spark-solr LuceneTextAnalyzer class aims to simplify access to this API via a streamlined interface. All of the analyze*() methods produce only text tokens – that is, none of the metadata associated with tokens (so-called “attributes”) produced by the Lucene analysis framework is output: token position increment and length, beginning and ending character offset, token type, etc. If these are important for your use case, see the “Extra-Solr Text Analysis” section below.

LuceneTextAnalyzer uses a stripped-down JSON schema with two sections: the analyzers section configures one or more named analysis pipelines; and the fields section maps field names to analyzers. We chose to define a schema separately from Solr’s schema because many of Solr’s schema features aren’t applicable outside of a search context, e.g.: separate indexing and query analysis; query-to-document similarity; non-text fields; indexed/stored/doc values specification; etc.

Lucene text analysis consists of three sequential phases: character filtering – whole-text modification; tokenization, in which the resulting text is split into tokens; and token filtering – modification/addition/removal of the produced tokens.

Here’s the skeleton of a schema with two defined analysis pipelines:

{ "analyzers": [{ "name": "...",
                    "charFilters": [{ "type": "...", ...}, ... ], 
                    "tokenizer": { "type": "...", ... },
                    "filters": [{ "type": "...", ... } ... ] }] },
                { "name": "...", 
                    "charFilters": [{ "type": "...", ...}, ... ], 
                    "tokenizer": { "type": "...", ... },
                    "filters": [{ "type": "...", ... }, ... ] }] } ],
  "fields": [{"name": "...", "analyzer": "..."}, { "regex": ".+", "analyzer": "..." }, ... ] }

In each JSON object in the analyzers array, there may be:

  • zero or more character filters, configured via an optional charFilters array of JSON objects;
  • exactly one tokenizer, configured via the required tokenizer JSON object; and
  • zero or more token filters, configured by an optional filters array of JSON objects.

Classes implementing each one of these three kinds of analysis components are referred to via the required type key in these components’ configuration objects, the value for which is the SPI name for the class, which is simply the case-insensitive class’s simple name with the -CharFilterFactory, -TokenizerFactory, or -(Token)FilterFactory suffix removed. See the javadocs for Lucene’s CharFilterFactory, TokenizerFactory and TokenFilterFactory classes for a list of subclasses, the javadocs for which include a description of the configuration parameters that may be specified as key/value pairs in the analysis component’s configuration JSON objects in the schema.

Below is a Scala snippet to display counts for the top 10 most frequent words extracted from spark-solr’s top-level README.adoc file, using LuceneTextAnalyzer configured with an analyzer consisting of StandardTokenizer (which implements the word break rules from Unicode’s UAX#29 standard) and LowerCaseFilter, a filter to downcase the extracted tokens. If you would like to play along at home: clone the spark-solr source code from Github; change directory to the root of the project; build the project (via mvn -DskipTests package); start the Spark shell (via $SPARK_HOME/bin/spark-shell --jars target/spark-solr-2.1.0-SNAPSHOT-shaded.jar); type paste: into the shell; and finally paste the code below into the shell after it prints // Entering paste mode (ctrl-D to finish):

import com.lucidworks.spark.analysis.LuceneTextAnalyzer
val schema = """{ "analyzers": [{ "name": "StdTokLower",
               |                  "tokenizer": { "type": "standard" },
               |                  "filters": [{ "type": "lowercase" }] }], 
               |  "fields": [{ "regex": ".+", "analyzer": "StdTokLower" }] }
             """.stripMargin
val analyzer = new LuceneTextAnalyzer(schema)
val file = sc.textFile("README.adoc")
val counts = file.flatMap(line => analyzer.analyze("anything", line))
                 .map(word => (word, 1))
                 .reduceByKey(_ + _)
                 .sortBy(_._2, false) // descending sort by count
println(counts.take(10).map(t => s"${t._1}(${t._2})").mkString(", "))

The top 10 token(count) tuples will be printed out:

the(158), to(103), solr(86), spark(77), a(72), in(44), you(44), of(40), for(35), from(34)

In the schema above, all field names are mapped to the StdTokLower analyzer via the "regex": ".+" mapping in the fields section – that’s why the call to analyzer.analyze() uses "anything" as the field name.

The results include lots of prepositions (“to”, “in”, “of”, “for”, “from”) and articles (“the” and “a”) – it would be nice to exclude those from our top 10 list. Lucene includes a token filter named StopFilter that removes words that match a blacklist, and it includes a default set of English stopwords that includes several prepositions and articles. Let’s add another analyzer to our schema that builds on our original analyzer by adding StopFilter:

import com.lucidworks.spark.analysis.LuceneTextAnalyzer
val schema = """{ "analyzers": [{ "name": "StdTokLower",
               |                  "tokenizer": { "type": "standard" },
               |                  "filters": [{ "type": "lowercase" }] },
               |                { "name": "StdTokLowerStop",
               |                  "tokenizer": { "type": "standard" },
               |                  "filters": [{ "type": "lowercase" },
               |                              { "type": "stop" }] }], 
               |  "fields": [{ "name": "all_tokens", "analyzer": "StdTokLower" },
               |             { "name": "no_stopwords", "analyzer": "StdTokLowerStop" } ]}
             """.stripMargin
val analyzer = new LuceneTextAnalyzer(schema)
val file = sc.textFile("README.adoc")
val counts = file.flatMap(line => analyzer.analyze("no_stopwords", line))
                 .map(word => (word, 1))
                 .reduceByKey(_ + _)
                 .sortBy(_._2, false)
println(counts.take(10).map(t => s"${t._1}(${t._2})").mkString(", "))

In the schema above, instead of mapping all fields to the original analyzer, only the all_tokens field will be mapped to the StdTokLower analyzer, and the no_stopwords field will be mapped to our new StdTokLowerStop analyzer.

spark-shell will print:

solr(86), spark(77), you(44), from(34), source(32), query(25), option(25), collection(24), data(20), can(19)

As you can see, the list above contains more important tokens from the file.

For more details about the schema, see the annotated example in the LuceneTextAnalyzer scaladocs.

LuceneTextAnalyzer has several other analysis methods: analyzeMV() to perform analysis on multi-valued input; and analyze(MV)Java() convenience methods that accept and emit Java-friendly datastructures. There is an overloaded set of these methods that take in a map keyed on field name, with text values to be analyzed – these methods return a map from field names to output token sequences.

Extracting text features in spark.ml pipelines

The spark.ml machine learning library includes a limited number of transformers that enable simple text analysis, but none support more than one input column, and none support multi-valued input columns.

The spark-solr project includes LuceneTextAnalyzerTransformer, which uses LuceneTextAnalyzer and its schema format, described above, to extract tokens from one or more DataFrame text columns, where each input column’s analysis configuration is specified by the schema.

If you don’t supply a schema (via e.g. the setAnalysisSchema() method), LuceneTextAnalyzerTransformer uses the default schema, below, which analyzes all fields in the same way: StandardTokenizer followed by LowerCaseFilter:

{ "analyzers": [{ "name": "StdTok_LowerCase",
                  "tokenizer": { "type": "standard" }, "filters": [{ "type": "lowercase" }] }],
  "fields": [{ "regex": ".+", "analyzer": "StdTok_LowerCase" }] }

LuceneTextAnalyzerTransformer puts all tokens extracted from all input columns into a single output column. If you want to keep the vocabulary from each column distinct from other columns’, you can prefix the tokens with the input column from which they came, e.g. word from column1 becomes column1=word – this option is turned off by default.

You can see LuceneTextAnalyzerTransformer in action in the spark-solr MLPipelineScala example, which shows how to use LuceneTextAnalyzerTransformer to extract text features to build a classification model to predict the newsgroup an article was posted to, based on the article’s text. If you wish to run this example, which expects the 20 newsgroups data to be indexed into a Solr cloud collection, follow the instructions in the scaladoc of the NewsgroupsIndexer example, then follow the instructions in the scaladoc of the MLPipelineScala example.

The MLPipelineScala example builds a Naive Bayes classifier by performing K-fold cross validation with hyper-parameter search over, among several other params’ values, whether or not to prefix tokens with the column from which they were extracted, and 2 different analysis schemas:

  val WhitespaceTokSchema =
    """{ "analyzers": [{ "name": "ws_tok", "tokenizer": { "type": "whitespace" } }],
      |  "fields": [{ "regex": ".+", "analyzer": "ws_tok" }] }""".stripMargin
  val StdTokLowerSchema =
    """{ "analyzers": [{ "name": "std_tok_lower", "tokenizer": { "type": "standard" },
      |                  "filters": [{ "type": "lowercase" }] }],
      |  "fields": [{ "regex": ".+", "analyzer": "std_tok_lower" }] }""".stripMargin
[...]
  val analyzer = new LuceneTextAnalyzerTransformer().setInputCols(contentFields).setOutputCol(WordsCol)
[...]
  val paramGridBuilder = new ParamGridBuilder()
    .addGrid(hashingTF.numFeatures, Array(1000, 5000))
    .addGrid(analyzer.analysisSchema, Array(WhitespaceTokSchema, StdTokLowerSchema))
    .addGrid(analyzer.prefixTokensWithInputCol)

When I run MLPipelineScala, the following log output says that the std_tok_lower analyzer outperformed the ws_tok analyzer, and not prepending the input column onto tokens worked better:

2016-04-08 18:17:38,106 [main] INFO  CrossValidator  - Best set of parameters:
{
	LuceneAnalyzer_9dc1a9c71e1f-analysisSchema: { "analyzers": [{ "name": "std_tok_lower", "tokenizer": { "type": "standard" },
                  "filters": [{ "type": "lowercase" }] }],
  "fields": [{ "regex": ".+", "analyzer": "std_tok_lower" }] },
	hashingTF_f24bc3f814bc-numFeatures: 5000,
	LuceneAnalyzer_9dc1a9c71e1f-prefixTokensWithInputCol: false,
	nb_1a5d9df2b638-smoothing: 0.5
}

Extra-Solr Text Analysis

Solr’s PreAnalyzedField field type enables the results of text analysis performed outside of Solr to be passed in and indexed/stored as if the analysis had been performed in Solr.

As of this writing, the spark-solr project depends on Solr 5.4.1, but prior to Solr 5.5.0, querying against fields of type PreAnalyzedField was not fully supported – see Solr JIRA issue SOLR-4619 for more information.

There is a branch on the spark-solr project, not yet committed to master or released, that adds the ability to produce JSON that can be parsed, then indexed and optionally stored, by Solr’s PreAnalyzedField.

Below is a Scala snippet to produce pre-analyzed JSON for a small piece of text using LuceneTextAnalyzer configured with an analyzer consisting of StandardTokenizer+LowerCaseFilter. If you would like to try this at home: clone the spark-solr source code from Github; change directory to the root of the project; checkout the branch (via git checkout SPAR-14-LuceneTextAnalyzer-PreAnalyzedField-JSON); build the project (via mvn -DskipTests package); start the Spark shell (via $SPARK_HOME/bin/spark-shell --jars target/spark-solr-2.1.0-SNAPSHOT-shaded.jar); type paste: into the shell; and finally paste the code below into the shell after it prints // Entering paste mode (ctrl-D to finish):

import com.lucidworks.spark.analysis.LuceneTextAnalyzer
val schema = """{ "analyzers": [{ "name": "StdTokLower",
               |                  "tokenizer": { "type": "standard" },
               |                  "filters": [{ "type": "lowercase" }] }], 
               |  "fields": [{ "regex": ".+", "analyzer": "StdTokLower" }] }
             """.stripMargin
val analyzer = new LuceneTextAnalyzer(schema)
val text = "Ignorance extends Bliss."
val fieldName = "myfield"
println(analyzer.toPreAnalyzedJson(fieldName, text, stored = true))

The following will be output (whitespace added):

{"v":"1","str":"Ignorance extends Bliss.","tokens":[
  {"t":"ignorance","s":0,"e":9,"i":1},
  {"t":"extends","s":10,"e":17,"i":1},
  {"t":"bliss","s":18,"e":23,"i":1}]}

If we make the value of the stored option false, then the str key, with the original text as its value, will not be included in the output JSON.

Summary

LuceneTextAnalyzer simplifies Lucene text analysis, and enables use of Solr’s PreAnalyzedField. LuceneTextAnalyzerTransformer allows for better text feature extraction by leveraging Lucene text analysis.

The post Better Feature Engineering with Spark, Solr, and Lucene Analyzers appeared first on Lucidworks.com.

Secure Fusion: Single Sign-On

$
0
0

Single Sign-On (SSO) mechanisms allow a user to use the same ID and password to gain access to a connected system or systems. In a web services or distributed computing environment, single sign-on can only be achieved by registering information about the sign-on authority with all systems that require its services. The previous article in this series Secure Fusion: Leveraging LDAP shows how to configure Fusion so that passwords and permissions are managed by an external LDAP server. Fusion can be configured to work with two more kinds of single sign-on mechanisms: Kerberos and SAML 2.0. This article covers the configuration details for both of these.

Fusion Logins and Security Realms

A Security Realm provides information about a domain, an authentication mechanism, and the permissions allotted to users from that domain. A Fusion instance can manage multiple security realms, which allows users from different domains to have access to specific Fusion collections.

For a non-native security realm, the domain and its user database exist outside of Fusion. Configuring Fusion for this realm simplifies the task of managing Fusion user accounts. Fusion need only store the username and user’s security realm; permissions for a specific user are inherited from the permissions defined for the users and groups belonging to that realm. It’s still possible to manage the permissions for that user directly in Fusion, but this goes against the principle of letting user management be somebody else’s problem.

When you first access Fusion via the browser, the initial login panel has three inputs: user name, password, and an unlabeled pulldown menu for realm choices. Fusion’s native realm, which is always available, is the default realm choice. To login via a non-native realm, choose the appropriate realm name from the pulldown menu. Choosing a non-native realm may change the login panel inputs. For an LDAP realm, a user enters their LDAP username and password in the appropriate boxes on the login panel and Fusion relays this information to the LDAP server for that realm for authentication. To login to either a Kerberos or SAML realm, the login panel doesn’t have inputs for either. In the screenshot below, the screenshot on the left shows the login panel for a native or LDAP realm and the screenshot on the right shows the login panel for a SAML or Kerberos realm:

login panels

Since all Fusion logins requires a username and password, how does the auth magic happen? There is no magic, just some browser sleight-of-hand. For SAML and Kerberos logins the browser becomes the intermediary between Fusion and the authentication mechanism. Because the authentication process works indirectly through the browser, system configuration requires additional work beyond registering the security realm information in Fusion. In order to understand the configuration details, we present a quick overview of how SAML and Kerberos work.

SAML

SAML is a standard for exchanging authentication and authorization data between security domains. The SAML protocol allows web-browser single sign-on (SSO) through a sequence of messages sent to and from the browser, which relays information between Fusion and the SAML authority acting as the Identity Provider (IDP). To configure Fusion for SAML, you must register the information about the SAML authority as part of the security realm configuration process. In addition to configuring the Fusion security realm, you must configure the SAML identity provider to recognize the Fusion application.

Once Fusion is configured for a SAML realm, this realm is added to the list of available realms on the initial Fusion sign-on panel. When the SAML realm is chosen from the list of available realms, the browser then redirects to the IDP which handles user authentication. Upon successful authentication, the IDP sends a response back to the browser which contains authentication and authorization information as well as the URL of the Fusion application. The browser redirects back to the Fusion URL, passing along the SAML message with the user authentication and authorization information. Fusion then issues a session cookie which is used for subsequent user access.

Kerberos and SPNEGO

Kerberos

kerberosThe name Kerberos comes from Greek mythology where Kerberos (or Cerberus) is the ferocious three-headed guard dog of Hades, the original hellhound. Kerberos protocol messages are protected against eavesdropping and replay attacks. Instead of sending passwords in plaintext over the network, encrypted passwords are used to generate time-sensitive tickets used for authentication.

Kerberos uses symmetric-key cryptography and a trusted third party called a Key Distribution Center (KDC) to authenticate users to a suite of network services, where a user can be either an end user or a client program. The computers managed by that KDC and any secondary KDCs constitute a realm. A Kerberized process is one which has been configured so that it can get tickets from a KDC and negotiate with Kerberos-aware services.

The next several paragraphs outline the steps involved in the Kerberos protocol. It’s background information, so you can skip ahead to the next section on SPNEGO, as this is pretty dry stuff. We tried to get Margot Robbie to explain it for you but she wasn’t available, so instead we downloaded the following diagram from some old MSDN documentation, since Microsoft’s Active Directory uses Kerberos for its security infrastructure. It shows the essential steps in the Kerberos protocol, from initial login through authentication and authorization to application access:

kerberos auth

Here is a summary of the steps outlined in the above cartoon, calling out the essential acronyms you need to know in order to configure Fusion for Kerberos authentication:

  • Step 1. To login, the client sends a message to the KDC’s Authorization Server (AS) requesting a ticket granting ticket (TGT).
  • Step 2. The Authorization Server verifies the user’s access rights and sends back an encrypted TGT and session key. At this point, the user is prompted for a password. The clear text password is encrypted before it is sent to the AS. If authentication succeeds, the user’s TGT will be valid for service requests.

Steps 1 and 2 happen only upon user login to the Kerberos realm, after which the TGT and session key are used to gain access to services in that realm.

  • Step 3. To access a Kerberized service, the client sends a message to the KDC’s Ticket Granting Service (TGS) which includes identity information encrypted using the session key received in step 2.
  • Step 4. The TGS verifies the request and creates a time-sensitive ticket for the requested service.
  • Step 5. The client application now sends a service request to the server containing the ticket received in Step 4 as well as identity information encrypted using the session key received in step 2. The server verifies that the ticket and identity information match, then grants access to the service.

SPNEGO

If a client application wishes to use a Kerberized service, the client must also be Kerberized so that it can support the necessary ticket and message exchanges. Since Fusion is a web service, available either in a browser or via HTTP requests to Fusion’s REST-API, then the web application used to access Fusion must be able to carry out the Kerberos protocol in order for the end user to access Fusion.

SPNEGO was developed to extend Kerberos to web applications using the standard HTTP protocol, starting with Internet Explorer. Both IE and Safari support SPNEGO out-of-the-box, while Firefox and Chrome require additional configuration. The Unix curl command-line utility also supports SPNEGO; it can access a Kerberized web service using the negotiate command-line option.

When a Fusion user belonging to a Kerberos security domain sends a request to the Kerberized Fusion UI via a web application that supports SPNEGO, the web application sends a SPNEGO request via HTTP or HTTPS to Fusion and Fusion communicates with the Kerberos KDC to determine the identify and authorization status of that user. If the user hasn’t authenticated to the KDC/Authentication Service, Fusion sends a 401 response to the web application which contains a Negotiate header. This status/header response triggers SPNEGO compatible clients to fetch a local ticket from their Kerberos “ticket tray” and they then encode the ticket and send it back to Fusion. Fusion decodes the ticket and perform a SPN.doAs(user) authentication request to the KDC/Authentication Service. Depending on the results, Fusion will either execute the original request (along with a session cookie) or return a 401 (without the Negotiate) to the browser.

Fusion Configuration

Configuring a new security realm can only be done by a Fusion user who has admin-level privileges. To configure a new security realm from the Fusion UI, from the “Applications” menu, choose menu item “Access Control”. This displays the Access control panel, which has sub-panel “Security Realms”. From the Security Realms sub-panel, click on the “Add Security Realm” button:

add security realm

This opens an editor panel for a new Security Realm, containing controls and inputs for all required and optional configuration information. The security realm name must be unique. There is a pulldown menu from which to choose the realm type:

choose realm type

Configuring Fusion for a SAML security realm

To configure a SAML realm, the realm type is “SAML”. On the Fusion UI, there SAML realm configuration requires the following pieces of information:

  • Identity Provider URL – the URL used by the SAML authority for single sign-on. Usually a URL which ends in “saml/sso”, e.g., “https://www.my-idp.com/<my-app-path>/sso/saml”
  • Issuer – SAML Issuer Id. A unique ID for that authority, e.g. “http://www.my-idp.com/exk686w2xi5KTuSXz0h7”.
  • Certificate Fingerprint – the contents of the SAML authority certificate, without the certificate header and footer. You must get this certificate from the SAML Identity Provider. The certificate is a text file which has a pair of header and footer lines which say “BEGIN CERTIFICATE” and “END CERTIFICATE”, respectively. The fingerprint consists of the lines between the header and the footer. You can cut and paste this information into the text box on the Fusion UI.
  • User ID Attribute – an optional attribute. The Identity Provider contains the user database. By default, the Fusion username is the same as the login name known to the Identity Provider. When another field or attribute in the user record stored by the IDP should be used as the Fusion username, that attribute name is the value of the User ID Attribute. To know whether or not you need to specify the User ID attribute, you need to be able to examine the user database stored by the IDP.

In addition to configuring Fusion for SAML, you must register Fusion with the SAML IDP. The amount of information varies depending on the SAML authority.

All systems will require the Fusion URL to redirect to upon successful login; this is the protocol, server, and port for the Fusion application, and path “api/saml”, e.g. “https://www.my-fusion-app.com:8764/api/saml”. If the Fusion application is running behind a load-balancer, then this URL is the load-balancer URL plus path “api/saml”. Note that the load-balancer should be session-sticky in order for the sequence of messages that comprise the SAML protocol to run to completion successfully.

Some authorities may require additional information. In particular the SAML 2.0 “AudienceRestriction” tag may be part of the SAML message. This tag specifies the domain for which the SAML trust conditions are valid, which is usually the domain in which the Fusion app is running, e.g. “https://www.my-fusion-app”.

See the Fusion Documentation for example configurations.

Configuring Fusion for a Kerberos security realm

If the Fusion application running in a Kerberos security realm will be interacting with other resources in that realm, then it is critical that Fusion has the proper Kerberos authorization to access those resources. This is determined by the Fusion’s identity and credentials. Getting this information properly squared away will almost always require working together with the sys admin that is the keeper of Kerberos. Bring gifts.

To configure a a new Kerberos security realm, the realm type is either “Kerberos” or “LDAP”:

  • To configure a realm which uses Kerberos for authentication and which doesn’t have an associated LDAP server for group-level permissions, choose option “Kerberos”.
  • To configure a realm which uses Kerberos for authentication and which also gets group-level membership and permissions from an LDAP server, choose option “LDAP”, and then in the “Authentication Method” section of the LDAP realm configuration panel, choose “Kerberos”, as shown here:

Kerberos/LDAP config

A Kerberos security realm requires two pieces of information:

  • Service Principal Name – this is the name for the Fusion service itself in the Kerberos database.
  • Keytab Path – the keytab files contains Fusion’s encrypted identity credentials which Fusion sends to the KDC during as part of the protocol described above.

The usual scenario in an enterprise organization is to have a Kerberos admin create a service principal with a random key password. Then, the admin generates a keytab, which is then used for Fusion service principal authentication.

See the Fusion Documentation on configuring Fusion for Kerberos for further details on keytab files and how to test them.

For Kerberos security realms which don’t use LDAP, the Fusion UI also displays inputs for the optional configuration parameter “Kerberos Name Rules”. These are used to specify what the Kerberos user’s Fusion username is. The default Fusion username is constructed by concatenating the Kerberos username, the “@” symbol, and the Kerberos domain name. E.g., user “any.user” in Kerberos domain “MYORG.ORG” will have the Fusion username “any.user@MYORG.ORG”.

Discussion

Fusion provides different types of security realms for different kinds of single sign-on mechanisms. The difference between the LDAP configuration, covered in the previous post in this series Leveraging LDAP, and the Kerberos and SAML mechanisms presented here is that for the latter, the dialog between Fusion and the servers which provides authentication and authorization is mediated by the browser.

In order for a Fusion application to work with a Kerberos or SAML realm, additional configuration steps are required outside of Fusion. In a Kerberized environment, there is a single Kerberos authority. Fusion itself is registered as a service with the Kerberos KDC. Once Fusion and the browser have been properly configured, Fusion can carry out the steps in the Kerberos/SPNEGO protocol. In SAML, everything is distributed, thus the Fusion application must be configured to work with the SAML authority and the SAML authority must be configured to work with Fusion. Checking you work is also more complicated; since Fusion doesn’t talk directly to the server, the configuration panels for Kerberos and SAML don’t provide a “test settings” control.

Configuring Fusion for single sign-on makes sense when there is a tight coupling between the owners and permissions on the documents in your collection and the individual users who have access to them. When your search application requires search over a collection with document-level security via ACLs, then you need to create a user account for all the users who can access those documents. Otherwise, Fusion’s native authentication mechanism is appropriate in situations where the users of the system fall into distinct categories and members of a category are interchangeable. In this case, you can define a set of generic users, one per category type, and assign permissions accordingly.

This is the fourth in a series of articles on securing your data in Lucidworks Fusion. Secure Fusion: SSL Configuration covers transport layer security and Secure Fusion: Authentication and Authorization covers general application-level security mechanisms in Fusion. This article and previous article Secure Fusion: Leveraging LDAP show how Fusion can be configured to work with external authority services, providing fine-grained security as needed. Fusion analyzes your data, your way, according to your access rules.

The post Secure Fusion: Single Sign-On appeared first on Lucidworks.com.

Viewing all 731 articles
Browse latest View live